
Ciliate
All photos are copywrited to Tim Wilson and may only be used with written permission.
Please refresh your browser when returning to see updates.
Ciliate
All photos are copywrited to Tim Wilson and may only be used with written permission.
Please refresh your browser when returning to see updates.
Would you like to contribute to my work?
I have given what information I have from my research and experience freely for years and I have asked for little in return. Now, for those who find value herein, I am asking for your help to give farming opportunity to a poor Mexican family, who I have become part of and responsible for. Following is a link to a gofundme page which is self-explanatory. Please have a read. It is in English and Spanish. If you feel inadequate to give please pass this along through your social media contacts.
https://www.gofundme.com/f/help-give-a-family-farm
Contact: thegoodjob@hotmail.com Contents>
Microbe Organics;
Microbe Organics? What the heck is this?; You ask. It is the name I chose to describe my approach to the understanding and interpretation of microbial based soil and plant amendments currently evolving in horticultural practices throughout the world. Two such practices which you may have heard of or use yourself are Compost Tea and EM (Effective Microorganisms {EMRO USA} or Beneficial and Effective Microorganisms{SCD}; 2 Brand Names). I will be focusing to begin with on the practical analysis and use of Compost Tea.
I am not an expert in this field of biology, in fact I am a lifelong student and will defer to the far superior overall knowledge of several experts in microbial based amendments, however what I have to offer is a translation or simplification of many of the terms, functions and observations surrounding this science. The reason I am able to do this is mostly due to my ‘I have to see it to believe it or comprehend it’ attitude. When I first started researching microbial based agriculture about six years ago I set up a small microscope laboratory enabling me to observe the microorganisms present in Compost Tea, microbial fermentations (e.g. EM), compost and soil. I set up an interface between a video camera, microscope and computer thus allowing me to capture real time video which has culminated thus far in the production of my first DVD.
Like the science which this growing (pun intended) phenomenon is based upon, this website will evolve over time. I will post links to sources of knowledge, supplies and practical solutions as I acquire permission to do so and as I learn of them. As I gain more skill managing this site I hope to post video footage of observations and experiments. Therefore keep checking back for updates.
Using This Page: I have a dislike for websites where one must wait for pages to load (especially true for limited Internet connections) so I have placed all the information on one page for now. You may access all subject headings via the links in the Contents section below and some subjects have subheadings which are also linked. Some topics may seem mis-ordered but you may always find something instantly by clicking 'Back to Contents' So click away.
Contents:
Articles & Resources;

What Is Compost Tea
More On Compost Tea (2013)
Organic Growing from a Microbial Perspective
Living Soil
Root Exudates
So You Wanna Build A Compost Tea Brewer
Microbe Identification
Who I am
Stuff I am Selling;
Please note that as of the end of May, 2017 KIS Farms/Organics
https://www.kisorganics.com
has taken over airlift brewer sales. You may continue getting downloads
here.
Video Downloads;
Microbe Identification DVD Download Option
Microscopy Instructional Video Download
Compost Tea Makers DIY Plans; Any problems with download; thegoodjob@hotmail.com
Plans to Build Your Own Mini-Microbulator
Plans to Build 50 Gallon Airlift Bioreactor (ACT Maker)
Please be aware these plans are designed to be used with a variety of sized pipe and parts.
It is not an exact scaled replication of the commercial Microbulator which is much more expensive to build.
Discontinued but Interesting
Microscopes
More Helpful Info & Ramblings;
Tests, Observations & Postulations
Resources & Links
Compost Tea Recipes
Very simply stated Compost Tea is a water-based environment wherein beneficial microorganisms are extracted from compost or vermicompost (worm compost) and multiplied by the millions and billions. Some form of agitation breaks the microbes free from the compost and they multiply because food, like black strap molasses, fish hydrolysate, kelp meal, etc. has been added to the water, which at least one type of microbe digests. When one or more type of microbe begins to multiply in response to the food, other microbes respond to this growth and begin to consume these initial microbes and multiply in turn and so on and so on. For example the initial microbes are usually bacteria which are food for protozoa so the protozoa multiply in response to the bacteria.
The end result is a functional feeding cycle or microbial nutrient cycle. I refer to this as a functional microbial consortia. This develops over a period of 12 to 72 hours or more and is then applied to the soil and plants. In the soil there are a number of organisms which function in basically the same nutrient cycle and zone. Once again, simply stated, there are substances released from the roots of plants which feed bacteria (& archaea), again the bacteria/archaea become prey to the protozoa and the protozoa excrete substances which are available to the roots as nutrients (e.g. nitrogen) thus creating a feeding cycle.
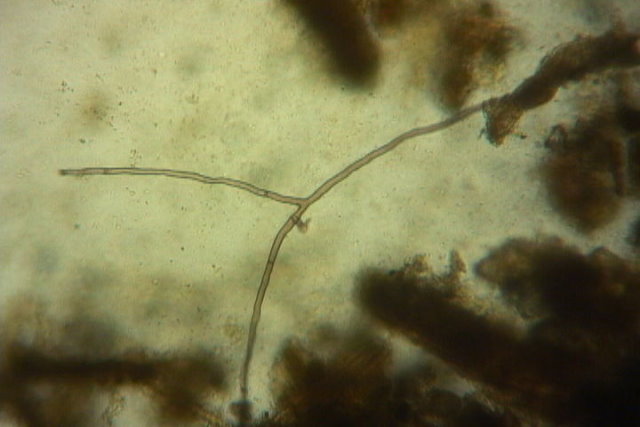
Other compost/soil microorganisms of great importance are fungi. Fungal hyphae, are long branching strands which grow through the soil and serve to; bind soil aggregates together, help retain moisture, store certain nutrients, provide a source of food to certain other microbes, provide pathways for nutrient and moisture delivery, decompose organic material and displace disease causing fungi. There are also other types of fungi which do not grow (to my knowledge) in compost or Compost Tea which form a direct symbiotic nutrient exchange relationship with roots.
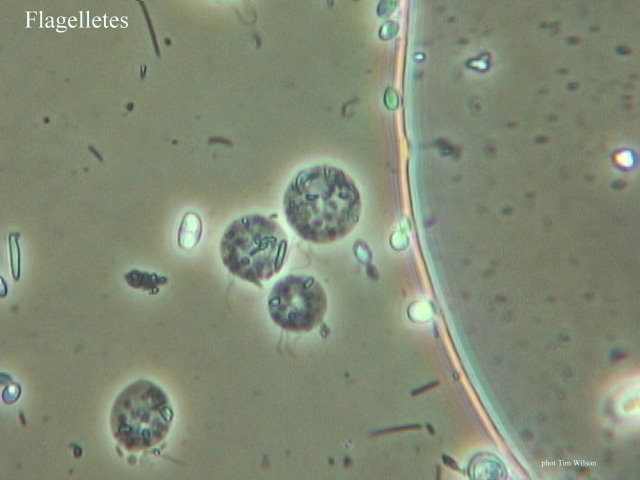
This sort of fungi is called mycorrhizal fungi and there are many different species. The major microorganisms at work in Compost Tea are bacteria, protozoa (flagellates, ciliates and amoebae) and fungal hyphae if present in your compost. It is best to have a wide diversity of each of these microbes present. There are higher order organisms like nematodes found in compost and soil and occasionally these are extracted into Compost Tea but they do not grow nor multiply in the tea. Of course in the soil there are many other contributors to the nutrient cycle, like insects, earthworms and other animals. In its totality this is often referred to as the soil food web.
Fungal Hyphae (phase contrast)

All life is in a symbiotic nutrient cycle even down to the microorganisms contained in our gut that assist us to digest certain foods. Life, consumption, excrement, death, decomposition, life. You are what you eat and the same applies to plants.
It has been discovered that aerated Compost Tea helps to ensure the multiplication of mostly aerobic microbes which are more desirable in this application. Plus the aeration provides the agitation necessary to dislodge the microbes from the compost. Therefore most Compost Tea machines or brewers, as they are commonly known, involve the introduction of air into the water and compost.
Many Compost Tea users and producers have begun examining their brews with microscopes to see the microbes present. This ensures that they have the desired microbes in the right numbers and diversity prior to applying the tea to soil and plants. I am fairly hopeful if not certain that in the future when someone purchases a Compost Tea brewer that the kit will include a microscope. It is the identification of what is going on in this tiny universe where I find my calling.
Fungal Hyphae (brightfield)
More on Compost Tea (2013)
I've decided to post this additional information in response to many inquiries I've had. You will find much of it redundant but better too much than too little, at least in this case.
In my opinion compost tea is poorly named. It is not something one drinks and it is not created by steeping in boiled water as is tea. Aerated compost tea making is an active process which extracts microorganisms (breaks them loose from binding spots) into aerated water and provides them with a food source (foodstock) which causes them to multiply.
A more apt name would be a microbe multiplier and the process is almost identical to a laboratory device known as a bioreactor. Actually we have attempted a name shift by calling our new 12 gallon device an airlift [vortex] bioreactor. This, in my opinion, is a more descriptive term for what is going on but it looks like the term compost tea is going to stick.
If one is using quality compost or vermicompost (hereinafter referred to as [vermi]compost), an efficient ACT maker with sufficient aeration and the correct amount of foodstock, like black strap molasses, it is all about timing and to an extent temperature.
One must, of course use water which is free of chlorine/chloramines. This is easily done by putting a bit of molasses, ascorbic acid or a bit of [vermi]compost in ahead of time, which neutralizes these oxidizers.
The first microbes to begin dividing and growing in ACT are bacteria/archaea and fungi (if present in the [vermi]compost). The fungi grows out rapidly as fungal hyphae and is often attached to pieces of organic matter free floating.
The bacteria/archaea can divide every 20 minutes and appear as moving (motile) or stationary (non-motile) dots, rods and long strands. Usually these organisms are seen in large volume by the 18 hour to 24 hour period of the process, which for simplicity’s sake we’ll call a brew (since that is the term which has been colloquially applied).
In response to the population explosion of bacteria/archaea we have a congruent reactive increase in the protozoa population beginning around the 24 hour period. The usual type of protozoa which we see, given an efficient brewer is flagellates, however sometimes there will also be naked amoebae. The third type of protozoa, which we do not wish to see a ton of, are ciliates, as they can indicate the presence of anaerobic bacteria. The flagellate population can double every 2 hours so usually at the 36 hour period we have a sufficient diversity of microorganisms to call the brew finished and apply it to the soil and plants.
A good temperature range is usually 65 to 75 F but unless really cold the timing estimate is quite reliable.
Why use compost tea?
The main reasons for using compost tea are;
1/ to provide a quick nutrient kick to the rhizosphere. This works mainly because as the flagellates (protozoa) consume the *bacteria/archaea they utilize only 10 to 40% of the energy intake for their sustenance and the remaining 60 to 90% is expelled as ionic form nutrient which is directly bio-available to the roots of the plants. This is known as ‘the microbial nutrient loop (cycle)’.
2/ to begin or continue an inoculation of the soil with a microbial population. Many of these microorganisms will go dormant until called upon later to fulfill their purpose but many of them will grow and flourish, finding their station in the hierarchical positioning of microbes in a living soil. Some, like the fungi will grow out through the soil binding aggregates together, assisting with air and moisture retention, providing pathways for bacteria/archaea, providing a food source for various microorganisms and degrading organic matter to a point where it is available for other organisms.
Within a very diverse ACT there will be free living nitrogen fixers, anti-pathogens and yes a few of the anaerobic and facultative anaerobes which serve their positive role in a living soil.
3/ to potentially provide the microorganisms which may assist in protecting plants from pathogens.
4/ because it allows the use of less [vermi]compost over a given area. There is nothing wrong with using only [vermi]compost instead of ACT if you have that much. ACT just allows you to use less [vermi]compost and it accelerates the microbial process.
*Note; I use the term bacteria/archaea because without complex testing it is not possible to visually tell the two apart. Recent research has revealed that archaea are commonly found in soil worldwide and have just as an important function in the microbial nutrient cycle as bacteria.
Recipes and Technique;
In case I have not been clear enough above, our goal in making ACT is to extract, multiply and grow mostly aerobic microorganisms in as large a diversity as possible and inclusive of three basic groups; bacteria/archaea, protozoa [flagellates & naked amoebae] and fungi. (Some [vermi]compost will contain rotifers which are extracted into ACT. These cycle nutrients in similar fashion to protozoa and are a bonus if present.)
Making ACT is not about putting in ingredients which directly benefit the plants. The foodstocks used are strictly to feed or benefit the microorganisms which in turn benefit the plants.
When I jumped on the compost tea bandwagon years back I utilized the whole gambit of ingredients recommended by the current (at that time) supposed authorities. These ingredients or foodstocks included, humic acid, kelp meal, black strap molasses, baby oatmeal (oat flour), fish hydrolysate, alfalfa meal, etc. We used variations of these ingredients in our 1200 gallon ACT maker on our farm and microscopic observation showed success.
I also experimented with using some rock/clay powders as ingredients and observed differences in the microbial make up which had positive results applied to the soil and plants. The types used were mostly soft rock phosphate and pyrophyllite.
Along the line somewhere we left humic acid out of a brew and noticed an increase in microbial numbers so we stopped using it ourselves but, possibly irresponsibly, I continued to recommend it because the ‘bigwigs’ did so. It was not until I devised a method to test each foodstock independently that I began to change my tune and begin to go against the grain of the contemporary experts.
By testing some ingredients independently in a liquid I observed;
1/ that humic acid in varying dilutions does not feed any sort of microscopically visible microbe. I observed that it actually suppresses microbial division and growth. This was confirmed by joint testing with Keep It Simple Inc. (KIS) in the Seattle area. We tested two of the most effective and popular brands. I cannot say definitively that all brands of humic acid will have similar suppressive effects in a liquid (ACT) but it is enough for me to discontinue using it or recommending it as an ACT foodstock. Please note that this does not mean that it is not good to use on/in soil….just not ACT.
2/ that kelp meal initially delays all microbial development in a liquid but does feed fungi and bacteria/archaea following 24 hours. If too much is used the effects are suppressive. From this I garnered that it should be used very sparingly and one must be prepared to brew a little longer if using this foodstock. Again, this does not mean that kelp meal is not a good thing to use in/on soil. It definitely is!
3/ black strap molasses (BSM) feeds both bacteria/archaea and fungi equally well contrary to what the A(A)CT aficionados were saying. The story was that BSM feeds only bacteria. This led to all sorts of misconceptions, even including ones made by USDA and Canada Agriculture scientists who declared that using molasses in ACT could lead to e-coli contamination. It is utter nonsense. Besides the testing I have done and ratifying assays carried out by KIS, it is common knowledge amongst many mycologists like Paul Stamets that BSM grows out fungal hyphae just fine.
4/ fish hydrolysate feeds both fungi and bacteria/archaea again contrary to the story at the time that it is mainly a fungal food. (I’m glad to see that story has now changed)
5/ alfalfa meal is also a decent all round foodstock which sometimes introduces protozoa cysts to the ACT. KIS has done more testing on this than I have.
The result of all this is that my attitude towards recipes for ACT has really evolved over the years with a trend towards the more simple. I know that there are a lot of people who place importance on creating a bacterial or fungal dominant ACT. At one time I myself was so influenced, however, the more I’ve learned and unlearned about living soil and a functioning microbial population interacting with plants, the more I’ve been led to allow the soil and plants to decide which microbes are actively needed by the rhizosphere team. What this means is that 9 times out of 10 I’m trying to create a balanced ACT with a decent ratio of the three basic microbial groups. When this hits the soil, some will go dormant to wake up later and some will be immediately put into action at the direction of the needs of the soil and plants.
The exceptions to this may be if I am attempting to battle a particular pathogen and want to attack it with a heavy fungal or bacterial (or a combo) ACT. In these situations some tweaking of recipes and timing can be helpful. If attempting these variations, a microscope is really the only way to confirm the desired microbial population. I have outlined some recipes which may trend towards a certain microbial group (or combo) or may assist with certain pathogens.
Recipes;
Through a plethora of trial and error brewing with a dissolved oxygen meter at hand we determined that a pretty reliable volume of [vermi]compost to use is 2.38% by volume of water used up to around a 250 gallon brewer.
So if you have 5 gallons you multiply that by 2.38% to get the amount of [vermi]compost to use. Then you can go to; http://www.onlineconversion.com/volume.htm and convert it into any unit of measure which is convenient. In my opinion measuring [vermi]compost by weight is inaccurate because of varying moisture content.
Anyway to proceed we have;
5 x 2.38% = 0.119 of a gallon = 0.476 of a quart = 0.450 of a liter
= 450.5 milliliters [450 rounded] = 1.904 cups [2 cups rounded] - Your choice
Likewise with the use of black strap molasses, a percentage of 0.50% is a good median amount to use.
These two ingredients, perhaps surprisingly, comprise the total of inputs in most of our brews these days. This simple recipe, if using an efficient ACT maker and good quality [vermi]compost results in a microbial population made up of the important three groups. This is the only recipe used to date, in all the videos on my Youtube channel ‘Microbe Organics’
To get these three groups the ACT maker should be run for 36 to 42 hours. The ideal temperature range is 65 to 72 Fahrenheit (18 to 22 Celsius), however a little cooler or warmer is okay. I’ve had pretty equivalent results with ambient temperatures around 100 F (38 C) and as cool as 50 F (10 C).
To spill a small secret, I’ve been pre-feeding or pre-activating [vermi]compost which is not so fresh by mixing in a small amount of wheat bran (livestock store or bulk foods department grocery store) and moistening with very diluted black strap molasses, loosely covered with cloth or paper towel 24 hours ahead of brew. (approximate ratios, wheat bran 1:30 [vermi]compost & BSM 1:300 water).
This has, so far resulted in (most of the time) attaining the desired microbial population at 24 hours brew time rather than the usual 36 to 42 hours.
Now for some of my other recipes;
A recipe for a balanced nutrient cycling ACT which many growers claim to have great success with is;
[vermi]compost – 2.38%
unsulphured pure black strap molasses - 0.50% [but you can use a maximum 0.75%]
fish hydrolysate (high quality) - 0.063%
Do not use chemically deodorized liquid fish!
kelp meal - 0.25% max. [Less is more!]
NOTE: This is a maximum amount of kelp and you can experiment using less. This is using regular grade kelp meal for livestock. If you have soluble kelp, I recommend using smaller amounts. As noted earlier kelp meal can initially delay bacterial multiplication and fungal growth in ACT.
soft rock phosphate granules/powder - 0.063% Consider this optional. In the past 2 years I’ve become more aware of the possibility of polonium 210 and lead content in soft rock phosphate which is radioactive. This varies depending on how it was mined and where. If you wish to use this in ACT check all available data. Look for heavy metal testing
We grind up the granules into a powder with a coffee grinder
The brew time should average around 36 hours and no longer than 48 hours. If you have a microscope then stop when the microbes desired are observed. Otherwise smell for the foodstocks being used up, possible rank odor (indicating anaerobes) and a positive earthy or mushroom-like aroma.
Fungal Brew;
If you want a brew which is more fungal increase the amount of fish hydrolysate to around 0.19% and you may wish to decrease the amount of molasses used so there is not a foodstock overload. Include a pinch of alfalfa meal, not using more than 0.25%. It is important to not overload a brew with foodstocks, otherwise you can easily compromise the dissolved oxygen capacity of the unit. Most importantly discontinue brewing around 18 to 20 hours. Of course if you have a microscope you can judge that for yourself.
Also, if you do not have fungi in your [vermi]compost, you won’t have it magically appear in your ACT.
A Few Extras;
I sometimes include a pinch or handful [depending on brewer size] of sphagnum peatmoss in a brew. Depending on where the peatmoss was harvested, it will contribute a set of microbes somewhat similar to that derived from the ‘Alaska’ humus or humisoil products on the market. It is a least a better bang for your buck and at best a trifle better quality-wise.
I’ve had inconsistent success battling powdery mildew by including soft rock phosphate and pyrophyllite clay powder, both at 0.063% in a 24 hour brew with horse manure fed vermicompost, BSM and fish hydrolysate. I have observed a very tiny peanut shaped bacteria/archaea in vast numbers with this recipe. In the ACT they are very active and appear to feed on yeast. This has led me to hypothesize that they ‘might’ be devouring powdery mildew but at this point that is pure conjecture.
Replacement for Molasses:
I’m continually getting this question. What can I use as a replacement for molasses?
Many people assume that molasses is just sugar and propose using various forms of sugar in its stead. This may actually work to some extent, however black strap molasses is a complex carbohydrate bearing lots of minerals and nutrients plus it is a powerful antioxidant. [some nutrient companies will happily sell you a bottle of carbo this or carbo that when it is actually just molasses, in some cases watered down]
I’m not saying there are not other foodstocks which can be used to feed bacteria/archaea and fungi. Heck, you can grow out some bacteria with potato water or rice water.
What I am saying is that black strap molasses works for the simple process of multiplying bacteria/archaea & fungi so why fret about using something else? If you are somewhere that you cannot get any, then by all means try something different or if you have a scope, go ahead and experiment.
I guess if I was stuck without molasses, I’d try wheat bran.
Mesh Bag or Free Suspension:
This is another decision when making ACT or designing an ACT maker. Do I throw the [vermi]compost into the water and let it float around or do I put it in a mesh extractor bag of some kind?
There are pros for both. Generally one gets a higher density of microorganisms if you just dump all your ingredients into the aerated, agitated water. I have observed over and over microscopically that this is the case. If you are using this method with an ACT design which circulates the water through a pipe like an airlift be aware that big chunks will plug up the pipe. Use fine [vermi]compost for this.
ACT made this way is most appropriate for applying to your soil but what if one wishes to spray it onto leaves? Perhaps you are trying to combat powdery mildew. Perhaps you want to run your ACT through an irrigation system.
This is when you are perhaps going to consider using a mesh bag. I researched many different mesh openings and materials before concluding that a 400 micron monofilament nylon mesh is the best for an extractor bag. This is also the size recommended by SFI. This is what we provide with our 50 gallon airlift brewer (as an optional configuration).
If you cannot find the perfect 400 micron mesh bag, don’t sweat it. Just get a paint strainer from the hardware store and tie it off with the ingredients and airline in it. Please do not use nylon socks/stockings. These usually have too small a mesh size to extract fungal hyphae (unless they are recycled from your 400 pound grandmother). Many people argue for using these by saying ‘hey man how big do ya think bacteria are?’ My reply to that is ‘hey man, bacteria is only one component of ACT’ What about the protozoa besides the fungi already mentioned?
If one does use a mesh extractor it is essential to either use a smaller (e.g. 5 gal) ACT maker which has enough agitation to make that bag dance or to use an air (diffuser) input into the bag.
If you have a cone bottom airlift bioreactor and you wish to use a mesh extractor, I recommend using a separate air pump to supply the bag.
I prefer to use a diffuser in the bag but many just use an open airline. I’m a believer in using what you have (except for chemicals). If you use a mesh bag you do not need to worry about a few large chunks. Many people make good quality ACT this way.
Filtering;
There is another option. Say you have an airlift vortex ACT bioreactor but to run it with a mesh bag would be kinda silly. You want to run it through a sprayer or irrigation set up. If your unit has a drain valve/spout, then just put a pail under it with a piece of mesh tied across the top. For this we use nylon window screen (800 to 1000 microns mesh size). Because some residue will block the passage we do not want to use 400 microns for this. Open the valve and as organic matter builds up on the screen scoop it off into another bucket. This prevents a build up which will block microbes but also allows you to save the ones that do get blocked, along with the organic matter for topdressing your soil or throwing into the compost pile. You can obviously see why a filter internal to a pipe or hose just won’t work.
Okay, I know that sounds like work. There is another way…the way we do it. Just empty out your ACT maker into the pail, use a mesh bag (800 to 1000 microns) with a sump pump dropped into it, hook the sump pump to a hose. There is your sprayer or waterer or irrigation hookup. When we don’t care about getting residue on leaf surfaces, like our corn or the lawn, we use a trash sump pump with no bag and a thumb over the end of the hose.
Frequency of Use;
You can use ACT as much as you wish. We often used it almost every watering. Just don’t waterlog your soil.
A friend of mine who used actual living microbial soil (ALMS) as opposed to truly living soil (TLO)…hehe, um used ACT for 7 years to beat back an erwinia infection caused by using chemicals in his one acre garden. The infection was gone in the first year but he liked the increased quality so much that he built a 5000 gallon ACT maker (venturi) and used it through his irrigation system. In the 8th and 9th years he only used it once as the microbial population was so well established and his soil had matured to the point where it was no longer necessary
Dilution;
This is another question I get all the time. How much should I dilute my ACT?
Now this is a difficult question to answer. I believe that SFI has stated that 20 gallons can be diluted to do one acre. In my opinion, this is stretching it but is within the realm of possibilities.
When diluting ACT it is not the same as diluting fish hydrolysate or molasses or (saints forbid) a liquid fertilizer. The water is not ‘weakening’ a solution so much as acting as a carrier for the microbes which you have multiplied. Logically though, if you do not have a ‘tea’ very dense with microorganisms, adding it to water will make it even less dense. So your 5 gallon ACT diluted down enough to cover the quarter acre is still going to get the microbes out there but in much lower numbers.
When we use ACT on our farm our usual practice is to apply it non-diluted, followed by irrigation water if necessary. When we were on the larger farm, we used a 1200 gallon multi-airlift brewer and pumped it straight into the irrigation system, then followed by water. We found that this was enough to do our greenhouse (20 x 64) and a quarter (approx. 750 sq. ft) of our outside beds. A total of just over 2,000 sq. ft. One acre is over 40,000 square feet.
For curiosity (on our little farm where we are now) we diluted 12 gallons of ‘tea’ into 40 gallons of water prior to use, this past season. I looked at it under the microscope before and after and although the microbes survived, they were indeed much more widely dispersed.
I guess the moral of the story is that you can dilute your ACT if you so wish but I think it is better applied non-diluted, followed by water ‘only if necessary’.
Adding Ingredients to a Finished Brew;
As I’ve mentioned we used to make 1200 gallon batches of ACT which we applied on our farm garden beds through an irrigation system. We used the same tank if we wanted to apply some other diluted soil amendment or fertilizer, like fish hydrolysate, molasses (occasionally) or humic acid.
I had read that many growers and landscapers were adding some of these amendments into their ACT just before applying and I believe this process was endorsed by SFI. Anyway we decided to try saving some time and money and dumped 5 gallons of fish hydrolysate into a 1200 gallon batch to pump out. I had, as usual examined the finished brew microscopically and out of curiosity took another sample after mixing in the fish hydrolysate. To my astonishment and dismay I had wiped out or put to sleep almost half of the microorganisms. This was the last time we did this.
We always apply amendments separately from ACT and this is what I recommend unless using the most minuscule amounts. I surmise that adding anything to a finished brew can have similar negative results. The amount of FH we used was 0.4%. If you have a microscope, go ahead and experiment.
Review of Some Common Myths; [In no particular order]
1/ Small bubbles destroy fungal hyphae or other microbes.
This is utter nonsense. The bubbles/air would need to be super compressed to harm any microorganisms.
2/ Molasses should not be used or only feeds bacteria.
Black strap molasses (BSM) is a complex sugar/carbohydrate and feeds bacteria/archaea and fungi equally well.
3/ Fungal hyphae is difficult to grow in ACT.
If you have fungi in your [vermi]compost and have a decent brewer design and use 0.50% BSM it will grow out in the first 15 to 20 hours along with bacteria.
4/ You can have too much air/agitation in a compost tea maker.
This would only be true to the extreme...if your water was jumping out everywhere. If a salesperson is telling you microbes need gentle bubbling, they do not know what they are talking about.
5/ One can make good ACT with an aquarium pump in 5 gallons of water.
We did almost a year straight of research (at a cost of thousands of dollars) building almost every conceivable compost tea brewer design and size, ranging from 1 to 1200 gallons. These included every type itemized on my webpage in the design section and more. We measured the dissolved oxygen (DO2) religiously at all hours of day and night, eliminating configurations which failed to maintain the DO2 at or above 6 PPM. This is close to the minimum level required to support aerobic organisms.
The outcome of this research was, the estimation, that the minimum flow required from an air pump to make compost tea while maintaining the DO2 at 6 PPM, is 0.05 CFM per gallon while the optimum flow is 0.08 CFM per gallon or greater. (the only exception was when utilizing airlifts)
This means that most aquarium pumps will not work with a 5 gallon ACT maker, no matter what a couple of guys from Texas say. Two gallons, perhaps.
6/ Nematodes are a common microbe in ACT.
I’ve received many emails from folks distraught over the fact that they found no nematodes in their ACT or that they had very few. This is normal. Unless you happen to have a species of nematode which is an aquatic dweller, (rare in compost wouldn’t you think) you are very unlikely to have many surviving in ACT over 4 or 5 hours old. Why? Because they drown. (according to those who raise and sell them) A few will survive, which accounts for some making it to the end. Even companies which sell nematodes instruct customers to not leave them in the distribution water more than two hours.
I’m pretty sure that this myth originated with SFI but even they (Dr. Ingham) have now changed their tune and say ACT is not a good environment for nematodes.
7/ You can tell that your ACT is finished or ready to use when it forms a head of foam.
More bunk! But this does have a bit of foundational truth. Foam can be formed by proteins in the water created by microbial activity, however this is not a reliable indicator. Foam can also be created by saponins (aloe vera, alfalfa, yucca) or just by adding molasses or by worms which might have made it in there. I have examined very foamy ACT microscopically which was practically devoid of microbes and ACT with no foam at all which has been swarming with microbial activity.
The best bet to tell when ACT is finished is to use it between 24 and 40 hours, smell it to make sure it has not gone anaerobic (you’ll know) and that most of the foods you added have been consumed. It should smell earthy or somewhat like mushrooms.
I’m not sure how this myth got started but it sure took off.
Back to Contents
Organic Growing from a Microbial Perspective
To come to a rudimentary understanding of how organic or natural growing really works, one must cast off previous miscomprehensions from the chemical model, that when we fertilize or add compost or other organic matter, we are feeding plants. This is not the case. With true organics one is feeding the microorganisms in the soil which convert organic nutrients into a form which can be assimilated by the roots of plants. According to studies, there are only a very few plant species capable of absorbing only a very few organic nutrients. Most plants are only capable of absorbing inorganic nutrients which are made that way by microbes which live at the root to soil interface, the rhizosphere. So the idea which you have, that you are feeding your plants when they appear to need nitrogen and you feed an organic fertilizer deemed high in nitrogen, is bogus. You are feeding the microbes which feed the plants.
Chemical fertilizers, mostly derived from petroleum are inorganic and can be absorbed by the roots of plants, however they are pollutants, which can cause a die off of and population change of soil microbes [** see addendum below], build up unused residues which run into the water table and, in my opinion, create harmful tissue changes in the plants which humans consume as food and medicine. In addition, I believe, the use of chemical fertilizers promote the incidence of plant pathogens like powdery mildew, erwinia, fusarium, pythium, etc. The grower can end up in a vicious spiraling downward fall as they use one chemical after another to control the effects brought on by the others.
The plant is no passive player in the natural growing game of survival but is the master conductor of this delicately balanced orchestra. The plant receives energy from above the soil in the form of light. This photosynthesis results in the plant’s internal production of carbon. It utilizes this carbon to create and reinforce tissue as it grows, so it is a very valuable commodity. As we all know the plant also requires a form of nitrogen (N) and other macro and micro-nutrients which it receives through the root system. As already stated this N must be in a form which the plant can directly uptake and use, usually a form of ammonia (N). Research has shown that when a plant needs to uptake N from the soil it sends out some of its precious carbon through it’s root system as a feed for bacteria and *archaea which live in the rhizosphere. [* Archaea are prokaryotes indiscernible from bacteria except through specialized testing; usually DNA] There are more complexities involved, such as, that certain plant types attract certain bacteria/archaea types but that is beyond the scope of this portrayal. When the bacterial/archaea population has increased in response to the carbons excreted by the roots, protozoa and bacterial feeding nematodes are attracted to the region, ‘hatch out’ from cysts and eggs respectively and in the case of protozoa multiply rapidly. Protozoa consist of flagellates, amoebae and ciliates. Some protozoa can multiply (divide) every 2 to 4 hours so their numbers can increase in short order. The protozoa and nematodes consume the bacteria/archaea and release, as waste, the ammonia (N) which the roots can then absorb. The multiplication rate of the bacteria/archaea increases in response to this predation and so on. This has been called the microbial loop. Protozoa are particularly good providers as their ‘digestive system’ only utilizes about 30% of the nutrients consumed meaning that roughly 70% is released as the waste which the roots crave. This factor, combined with their short generational time makes them real feeding machines. Undoubtedly there are micronutrients also processed and absorbed in this cycle. There are still many mysteries which research has yet to unfold or are not yet known to this author.
This is not the end. The concert continues. The bacteria/archaea also consume the ammonia (N) which is now bioavailable to them, so are in competition with the plant for these nutrients. Because of this, if there are no predators or insufficient numbers to consume the bacteria/archaea they could potentially lock up the N. When the plant is growing it is in a vegetative state and requires a large load of available nitrogen (N) so it is advantageous for it to continue this release of carbon and maintain a balance of bacteria/archaea and protozoa, while uptaking just the right amounts of nutrients. Don’t get me wrong. There are other players in this orchestra, either playing subdued roles or waiting their turn to play. There are higher order animals like mites, other microarthropods and worms. There are various forms of fungi, most of which are degraders but some of which are mycorrhizal. These all have roles in breaking down organic matter into a form which can then be mineralized by the plant’s bacteria/archaea team or delivered directly to the roots.
When the plant receives its signal from the upper world, above the soil, that it is time to switch gears and produce flowers and or fruit, its nutrient requirement changes. Although the mechanics are not well known to this author, studies indicate that the plant then increases the uptake of the ammonia (N) (bioavailable nitrogen) and reduces or stops excreting the carbon which feeds the bacteria/archaea. This effectively starves the bacteria/archaea which will react by dying or becoming dormant. This of course results in a similar reaction by the protozoa and bacterial feeding nematode population. The mycorrhizal fungi previously mentioned is then triggered into increased growth and production. Studies have indicated that the transference of bioavailable phosphorus and potassium to the roots occur mainly as a function of arbuscular mycorrhizal fungal hyphae in symbiotic relationship with the roots of the plant. The fungal hyphae (microscopic strands) grow right into the root cells and exchange nutrients. In exchange for carbon, once again released by the plant, the fungal hyphae delivers the required bioavailable nutrients to the root system. The fungal structure derives these nutrients from organic matter and food sources in the soil, some naturally processed by the other players as previously mentioned. It is my hypothesis that the form of carbon released to stimulate the mycorrhizal activity is of a varied molecular structure from that released to promote the bacteria/archaea population previously discussed, however I have no direct data to substantiate this. There are often different types of bacteria which accompany mycorrhizal fungi, adhering to the fungal hyphae in a symbiotic relationship. It is thought that these bacterial species function to exchange nutrients with the fungi as well as to protect the fungal hyphae from consumption by other microbes and even contribute to the protection of the plant from pathogenic fungi. There are other types of mycorrhizal fungi (ectomycorrhizal) which encapsulate roots rather than entering them but these are mostly associated with trees in the temperate and boreal regions.
So you see it is quite a complex arrangement which the plant conducts or controls and there are many facets which yet remain a mystery.
** Addendum to Organic Growing From a Microbial Perspective
Okay, since I wrote Organic Growing from a Microbial Perspective I’ve received feedback which clearly outlines the need to explain the ‘chemicals killing beneficial soil microbes thing’, the role of NPK ratings as well as the pollutants statement. This feedback is justifiable. Please bear with the redundancy of the following. It reflects my attempt to be thorough.
It may be so, that some beneficial microbial life is out and out killed by chemical fertilizers but the more likely cause of death occurs over an extended period which I’ll attempt to explain.
There are bacteria/archaea that will happily feed on chemical fertilizers. Indeed, there are bacteria that will 'feast' on diesel fuel. It is more likely that the use of chemical fertilizers negatively effect soil biota over a period of time. Chemical N (for example) is (to my knowledge) delivered to the roots of plants in ionic form, bypassing the whole microbial nutrient loop, which occurs through degraded organic matter being delivered in several processes; one major way being by bacterial/archaeal [sic] predation by protozoa (& bacterial feeding nematodes). It follows logically that if chemical fertilizers are used over an extended period (days? months? years?) that the microbial nutrient cycle will slow and/or cease.
The other side to this is that plants emit compounds from their roots which feed bacteria/archaea and fungi (of species conducive to their survival[?]) as an active participant in this microbial nutrient loop. Logically, if the plant is receiving direct feed ionic nutrients it is likely to slow and/or cease this process.
I compare this to a patient receiving intravenous feeding for a period of time and then needing to slowly adjust to real food again when the IV is discontinued.
The effects over a period of time (days? months? years?) will likely cause a die off of soil biota of a particular microbial consortia but may stimulate the growth of another microbial consortia (possibly/probably not as balanced and beneficial as the natural one), possibly causing disease.
I hypothesize another factor that may have effect is that when the plant is an active participant in the microbial nutrient cycle it 'decides' what nutrients it requires in time shifts unknown to us. If we are using chemical fertilizers quite likely much goes unused by the plant or is absorbed by the plant unnecessarily, perhaps promoting disease. The unused chemicals pass into the groundwater and streams or into the atmosphere. We've all heard the detriments around that and this is the pollution to which I refer.
What about NPK in Natural Growing?
I’ll try to write something up which illustrates the difference between nutrient processing and utilization from a chemical and natural (or organic) standpoint (for want of a better word). The following information and opinion is stated by me and is derived from the citations and links provided. I use the words ‘apparently’ and ‘appears’ because I believe knowledge and science is fluid. I also don’t pretend to understand everything perfectly and may need correcting. Just because we know the Earth is not flat does not mean we know everything about it.
To simplify things I’ll restrict the discussion to the plant’s use of nitrogen (N). The forms of N which plant roots are able to uptake are in ionic form or soluble. These soluble forms of N are ammonium (NH4+) and nitrate (NO3-). Very simply stated these soluble forms of N are instantly available in chemical N and there is no need for any bacterial/archaeal (B/A) mineralization to make them available to the roots of plants. There is some indication that some soluble ammonium is utilized by B/A and mineralized into nitrates, however this appears (to me) somewhat an opportunistic occurrence (from the B/A perspective). So yes we can concur that B/A eats and thrives on some chemically provided ions but this action is not a necessary one for the plant to uptake exactly the same ions as are being consumed by the B/A. In certain circumstances the B/A will be in competition with the plant for these nutrients. So it appears that plants can grow in this fashion without interaction by mineralizing B/A. It appears that the chemically provided ions (soluble N) completely bypass the microbial nutrient cycle.
With natural or organic growing, N ( R-NH2 ) for the plant is contained (sequestered) in a non-soluble (non-ionic) form in organic matter (or in the case of the gardener; compost and other soil foods). It is true that there are certain known bacteria (and now some archaea) which directly fix and supply ionic forms of N to the roots of plants and this is an area where ‘we’ are still learning so all is not known by any stretch. However soil scientists have discovered and it is common knowledge (as knowledge goes) that the bulk of NH4+ and NO3- are delivered to the roots of plants by protozoa (flagellates, amoebae and ciliates). This occurs in a complex network ostensibly, controlled in large degree by the plant. The plant releases compounds from the roots which feed B/A, thereby increasing the B/A population. The B/A consumes/processes forms of R-NH2 or forms which are pre-degraded by fungi and or other B/A. The B/A further multiply with a good supply of food and their large population encourages the excysting (hatching from cysts) and dividing of protozoa. The protozoa prey upon the B/A and in an approximate 30 minute period complete the excretion of NH4+ and/or NO3- available to the roots of the plants. Apparently protozoa only utilize 30 to 40 percent of the nutrient consumed making 60 to 70% available to plants and many have a division cycle of 2 hours so the efficiency of this nutrient delivery system is considerable. Just as it began, the microbial N cycle can be rapidly shut down by chemical emissions from the plant. It is apparent that the nutrient needs of the plant can change within short periods (perhaps in hours). There is much yet unknown, however I hypothesize that even disease control may be effected by a sudden reduction of N in the rhizosphere. This is certainly something which cannot be effectively manipulated by chemical N applications.
My goal in writing this was to illustrate the stark differences between the use by a plant of chemically provided ions and those derived through the microbial nutrient cycle. I believe I have succeeded. There are other ways which plants obtain N, such as through fungal interactions but that is nature; always have a back up.
I did fail to find information detailing the effects of chemical soluble N on protozoa populations. Although we humans have great confidence in our ability to mimic natural molecules sometimes we discover it is the subtle variances going unnoticed which end up having the greatest effects.
Some References;
Email me if you wish to track down these references.
Protozoa and plant growth: 2003;
the microbial loop in soil revisited; Michael Bonkowski;
Rhizosphere Ecology Group, Institut für Zoologie, Technische Universität Darmstadt,
Darmstadt, Germany
Soil microbial loop and nutrient uptake by plants: a test
using a coupled C:N model of plant–microbial interactions
Xavier Raynaud Jean-Christophe Lata
Paul W. Leadley
Plant Soil
DOI 10.1007/s11104-006-9003-9
The mycorrhiza helper bacteria revisited; 2007 P. Frey-Klett, J. Garbaye and M. Tarkka
Interactions Arbres/Micro-organismes, Champenoux, France;
UFZ-Department of Soil Ecology, Helmholz Centre for Environmental
Research, Halle, Germany
Modern Soil Microbiology; 2nd edition 2007 - Chapter 6 - Protozoa and Other Protista in Soil
Marianne Clarholm, Michael Bonkowski, and Bryan Griffiths
Soil protozoa: an under-researched microbial group gaining momentum
Marianne Clarholm
Department of Forest Mycology and Pathology, Swedish University of Agricultural Sciences (SLU), Box 7026, S-750 07 Uppsala, Sweden
Soil Biology & Biochemistry 37 (2005) 811–817
SOIL BIOTA, SOIL SYSTEMS, AND PROCESSES
David C. Coleman
University of Georgia
I created a PDF from a write up I found on the WSU website. I created this without permission but I believe the authors won't mind. I think some may find it helps to clarify the N cycle, etc.
NPK Cycle
The link for the write up is http://cru.cahe.wsu.edu/CEPublications/eb1722/eb1722.html
How to Apply All This to Horticultural Activities
You say, okay so that’s how it works but how do I apply that to my growing situation? The answer is pretty simple really. You need to assure that there is organic matter, mostly in the form of composted plant and animal (manure) substances in or on your soil for a microbial inoculant and food source. Additionally you can add microbial foodstocks such as diluted fish hydrolysate and molasses and kelp meal, alfalfa meal and rock phosphate and other clay and rock powders if available. It is very good to include rock phosphate in your composting process if you are making your own. Rock phosphate in the compost adds a long lasting source of phosphorus for microbes to draw from. At time of planting it is highly beneficial to place some mycorrhizal fungi spores in the hole or on the root system. You can research the best strain of fungi for the plants you are growing and purchase the spores from a number of suppliers. [ http://www.mycorrhizae.com http://www.fungi.com ] You may also consider seeding companion edible mushrooms which provide a dual benefit of cycling nutrients to your plants and providing your breakfast. You may research this at the fungi.com site. The rest is governed by the plant, as previously discussed, assuming that all the necessary components are available from the organic matter and additional foodstocks provided. In my opinion manipulation of the pH is not a wise practice in natural growing unless dramatic acidity or alkalinity are measured. Soil with a healthy microbial population tends to self regulate the pH. One should disturb the soil as little as possible so as to leave fungal growth and strands intact. I realize this is challenging when growing in containers. I have run trials where wooden bins were constructed (2’x3’x1.5’ deep) where soil was successfully left intact after annual plants were harvested and replanted over several seasons. In between plantings composting worms were introduced to help consume the residual dead roots and plant matter. The worms were later trapped out. Compost tea was applied regularly to boost the soil microbial population. Over time there developed something of a miniature ecosystem complete with mushrooms, rove beetles and other beneficial bugs. If you are growing in smaller containers it is a good idea to provide a high volume of quality compost and or vermicompost at the onset.
Some people grow herbs (like cannabis) and edible produce in containers organically. Because this has been practiced extensively utilizing chemical fertilizers, there is a period where growers have flushed the soil with copious amounts of water, the thought being that they are removing the harsh or harmful chemicals from the plant tissues. Too late! Those chemicals are already integrated into what you plan to put on your dinner plate or in your medicinal tea or pipe. At least that’s my opinion. If you have grown your produce naturally allowing the plant to be in control, this flushing routine is not only unnecessary but sort of stupid. Since plants are not able to uptake organic nutrients, what exactly would you be flushing away? You might instead be water logging your soil and roots.
Using Compost Tea
The use of compost tea (CT) is one of the best ways to inoculate your soil with the beneficial microbes you wish to have for optimum health of your plants. It is also good if your supply of compost or vermicompost is limited, as it multiplies those microbes, we have been discussing, by the millions. Remember the protozoa I mentioned earlier? Well you can brew an aerated compost tea specifically to have a large population of protozoa, usually mostly flagellates. If you have a good quality compost or vermicompost, protozoa will already be present, often in a resting cyst. If you have an efficient aerated brewer you can pretty much count on having a high flagellate (protozoa) population combined with bacteria/archaea and fungal hyphae (not mycorrhizal) at 36 to 44 hours brew time (65 to 72 degrees F). If you have a microscope you can examine the CT periodically to be sure that the microbial population is optimum. The use of aerated compost tea also provides the opportunity to manipulate microbial populations for specific purposes by using various recipes and brew times. You may wish to have high bacterial or fungal numbers for pathogen/disease control or have soil or plants that require a higher population of a microbial type. I have a lot to learn yet of fungal species which can grow in compost tea so until I have learned to identify the species occurring I’m cautious about some of the tricks employed to stimulate fungal hyphae growth in compost. Better to count on good quality compost and vermicompost with natural occurring quantities and species of fungi and use known mycorrhizal and mushroom spores in the soil.
As always, I am open to correction or refinement of what I have written.
Salutations,
Tim
Back to Contents
Living Soil
The term ‘living soil’ is getting a lot of lip service these days, however a living breathing moving soil is a thing to behold and great to grow with. It just gets better as it becomes more alive. I’d like to try describing to you what this means.
A living soil is comprised of a large variety of creatures, mostly microscopic and single celled. Part of this life is the plant itself but billions of life forms which support this plant and microcosm are arranged hierarchically at a level in the soil to which they have evolved for optimum survival and the wholistic function of their universe.
There are multiple interfaces in the soil. There are millions of small pores throughout, millions of various particles interfacing as aggregate; sand, clay, silt, rock, organic matter, humus and thousands or millions of roots interfacing these.
Besides these areas of contact or buffer, there are some broader distinct fields of transpiration between life forms which thrive within certain steadfast environmental conditions. This is why, as horticulturists, we may achieve living soil through minimal soil disturbance or no-till.
To describe these fields, first lets talk about the soil’s surface. Soil scientists call this the detritusphere, not a very complex name when you consider what detritus encompasses. So here is where stuff falls; everything from leaves to poop and this is where the greatest velocity and frequency of decomposition occurs. The detritus is principally carbon based. The elements of oxygen, nitrogen, light and moisture combine with the microorganisms evolved to this environment to do their job of degradation through consumption. These organisms are specialized to use the components and fuel available in the top layer of the soil, let’s say the top one to three inches dependent on soil type.
At a lower depth they would not function similarly because the fuel would be lacking. The material processed as waste by these microbes is then passed down to the next set of microorganisms evolved to process that modified substance.
If the raw detritus is worked into the soil, without first being degraded by surface dwellers, then the subsurface microbes can become overwhelmed (if I can use such an expression for microbes) with the task and can easily use up any and all nitrogen at hand decomposing this organic matter, thereby depriving local plants of this nitrogen. This can result in what some refer to as nitrogen lock out or lock up.
The next interface is where openings are created by earthworms, nematodes and other larger creatures, rather comically called the drilosphere by scientists. This is an area where some of the previously described material is conveyed by the bugs n’worms along with bug n’ worm poo and bioslime. The bioslime created is important for binding particles and contributing to aggregation. Obviously these create unique passage ways for certain sized organisms, air and water.
Branching off of these passages and stretching into the entire area which we call our living soil is a myriad of various sized openings and caverns. This area is referred to as the porosphere. This is where the meat and potatoes of the soil grows, is stored and is hunted. It is this zone which interfaces with the roots, which as most know, is called the rhizosphere.
Of critical importance is the conjoining matter, the particles or chunks which comprise the soil itself. These pieces once bound together by bacterial and fungal ‘bioslime’ is referred to as aggregated material and how they cohese is what forms the aggregatusphere (another complex term ;>). The aggregation is bound by fungal hyphae, roots and various gel-like polymers and carbohydrates excreted from plants and creatures alike.
When the gardener/horticulturist first mixes their soil, they can have some pretty
good control over the size of pores created, balanced with
decomposed/aged/composted organic matter.
The various sized particulate creates the multitudinous openings and caverns which make survival habitats for certain small organisms like bacteria and archaea and hunting grounds and habitat for some larger organisms like protozoa, nematodes and rotifers. These spaces flow with water and air allowing bacteria, archaea and fungi to mine the stored/sequestered nutrients, from vermicompost, compost, humus, clay/rock and other organic matter, which are then passed via the rhizosphere in a number of ways to the roots. There are miniature pockets of water bound to soil particles which are necessary to the survival of many microorganisms.
Methods of Nutrient Assimilation in the Rhizosphere
There are a variety of ways in which plants uptake nutrients organically/naturally. The majority of relevant current research indicates that most nutrients are derived from the predation of bacteria and archaea by protozoa and nematodes. The waste produced by the larger organisms is in ionic form, being directly taken up by the roots. In addition to this there are mycorrhizal associations between certain types of fungi and roots whereby the fungi provide the roots with nutrients and receive nutrients in exchange.
The most active protozoa contributing to this nutrient loop are flagellates and naked amoebae, however ciliates and testate amoebae cycle nutrients to a lesser degree in an aerobic soil. As the flagellates and naked amoebae consume bacteria/archaea they utilize somewhere from 10 to 40% of the energy intake for sustenance, dependent on species. The excess is excreted in a (ionic) form directly available to the roots of the plants. This means a plant can receive a whopping 60 to 90% nutrient bonus from this exchange.
As I have indicated previously the plant is not necessarily passive in this process. Studies show that plants emit certain carbons from their roots which attract and feed specific types of bacteria/archaea. Once these bacteria/archaea begin to divide, they begin pigging out on the adjacent organic matter (using organic acids) and the population explodes, thereby stimulating a resultant protozoa population explosion. Talk about a return on your investment.
We should not leave the bacterial feeding nematode out of this. They also cycle nutrients via the microbial nutrient loop in similar fashion by predation of bacteria/archaea and excreting bio-available nutrients. One difference is that they require about 50 to 70% of the energy intake for sustenance, however they are much, much larger. I suppose that due to their size, they cannot get to some spots that protozoa do. The other consideration is that bacteria can multiply every 20 minutes and protozoa every 2 hours, while nematode eggs take 4 to 7 days to 'hatch'. Tough to do the math.
Roots also exude various organic acids like carbonic acid, citric acid, malate, oxolate and several others. These acids solubilize sequestered nutrients into an ionic form which they can assimilate. [e.g. dissolved organic nitrogen (DON); phosphorus; (DOP)] Some bacteria and archaea (besides the nutrient loop previously described) excrete similar acids which degrade organic matter and provide nutrients directly to the roots or the soil solution (an area in the rhizosphere where nutrients are in solution) and some fix atmospheric nitrogen and are symbiotic with legumes.
[note: fungi also excrete similar organic acids to release/degrade nutrients from organic matter]
CEC
Where does CEC (cation exchange capacity) come into this picture? The CEC is your soil’s capacity to hold nutrients. It is based on your soil components having a negative charge and holding on to positively charged nutrients. Various types of clay like bentonite, organic matter and sphagnum peatmoss have excellent CEC.
It is this researcher/gardener’s understanding or hypothesis that the nutrients which are held in place in the soil are released by the various types of acids (citric, carbonic…others) mentioned previously. These acids are exuded by bacteria, archaea or roots to create hydrogen ions which then displace (exchange for) into the soil solution, the nutrient ions required by the plant. In the case of bacteria/archaea which have consumed these nutrients, they are themselves consumed by protozoa and nematodes which they expel as waste in ionic form nutrient immediately available to the plant, as previously described.
It appears that this method of uptaking the desired nutrient is more 'economically' viable for the plant. Rather than expending its precious resources to mineralize (release) these nutrients, the bacteria, archaea, protozoa and nematode pull it off for her.
Soil Composition?
In my opinion, the number one method of nutrient uptake listed above that the horticulturist can influence is the predation of bacteria/archaea by protozoa (and perhaps nematodes). By ensuring a good soil base with a variety of pore sizes but with lots of adequate drainage, moisture retaining substance and composted organic matter, one will provide good habitat and hiding spots for these organisms to flourish.
When creating your soil mix bear in mind that you wish to create long lasting spaces or pores of various sizes so it is best to include some very slow to decompose organic matter and some rock or sand-like particles along with some of your faster degrading compost to see you through your first season as your soil matrix comes to life.
I won't get into specific ingredients, as others are better able to list these. Besides, I'm a believer in using what is close at hand, easily available and cheap.
There is another sphere of influence in the soil which I feel is of importance and that is the interface between stone/rock and the upper portions of the soil. For container growing there is going to be variance in accord with your container size and depth and the way you wish to arrange things. I do believe that there are groups of microorganisms (bacteria/archaea & fungi) which work at certain depths with limited to no oxygen which mineralize nutrients from stone, rock and rock powders. In similar fashion to the surface dwellers, the nutrient waste which they process is passed up the chain and then to the roots. Within this hypothesis there may be some logic in placing a layer of small stones or gravel in the bottom of a container. Of course this makes more sense in a larger, deeper container.
Anecdotally, I surmise that a variety of colors of rock/stone is beneficial. This is more of a gut feeling and is derived from the idea that as humans we assimilate more vitamins and minerals by choosing diversely colored foods.
I hope I have conveyed that allowing microbes to live and function hierarchically at their optimum position undisturbed is how a horticulturist best achieves living soil. By leaving soil undisturbed fungal hyphae circuitry remains established, mycorrhizal colonization of roots takes place more quickly, networks of microbial nutrient exchange stay in optimum position.
Of course it is a decision which each grower must make on their own, balancing what is feasible and convenient to the space available and to their lifestyle and ability. I can attest that my experience with this method of container growing is that the soil just seems to get better with each season.
It is important to keep it alive through additions of organic matter, topdressed and I believe a minimum volume of 5 gallons and 14 inches depth is important. A larger volume is likely better. Allowing the soil to be populated by small arthropods, nematodes and perhaps earthworms is of great value.
In parting I’d like to avoid any confusion between the distinct areas of the soil habitat I’ve discussed and a recent popularized growing method involving nutrient layers. The level of soil (top 2 to 3 feet) in which most plants grow, naturally or agriculturally is quite homogenous as I have described above and raw nutrients are naturally added at the surface as I have described and not frequently via surprise layers or spikes.
I’ve listed some references and reading resources below.
1/ A Hierarchical Approach to Evaluating the Significance of Soil Biodiversity to Biogeochemical Cycling
2/ MH Beare, DC Coleman, DA Crossley Jr, PF Hendrix, EP Odum
Plant & Soil Journal; 170; 5-22, 1995 ; Netherlands
3/ Regulation of soil organic matter dynamics and microbial activity
in the drilosphere and the role of interactions with other edaphic functional domain
George G. Browna, Isabelle Baroisa, Patrick Lavelle
Eur. J. Soil Biol. 36 (2000) 177-198
4/ The role of biology in the formation stabilization and degredation of soil structure
JM Oades; Dept. of Soil Science, University of Adelaide, Australia – 1992
5/ Resource, biological community and soil functional stability dynamics at the soil–litter interface
Manqiang Liu ⇑, Xiaoyun Chen, Shi Chen, Huixin Li, Feng Hu
Soil Ecology Lab, College of Resources and Environmental Sciences, Nanjing Agriculture University, Nanjing 210095, China 2011
6/ Microbial diversity and soil functions
P. NANNIPIERI, J. ASCHER, M. T. CECCHERINI, L. LANDI, G. PIETRAMELLARA & G. RENELLA
Dipartimento della Scienza del Suolo e Nutrizione della Pianta, Universita` degli Studi di Firenze, 50144 Firenze, Italy
European Journal of Soil Science, December 2003, 54, 655–670
7/ The Rhizosphere: An Ecological Perspective - Edited by Z.G. Cardon & J.L. Whitbeck. B. M. McKenzie – 2008
8/ Modern Soil Microbiology, Second Edition by Jan Dirk Van Elsas (Editor), Van Elsas Van Elsas, Janet K Jansson (Editor) – 2006
9/ Organic acids in the rhizosphere – a critical review
David L. Jones
School of Agricultural and Forest Sciences, University of Wales, Bangor, Gwynedd, LL57 2UW, UK Plant and Soil 205: 25–44, 1998.
10/ Interactions between rhizosphere microorganisms and plants governing iron and phosphorus availability
Petra Marschner, University of Adelaide David Crowley University of California, Riverside, USA and Zed Rengel The University of Western Australia, Australia 2010
11/ A Link Between Citrate and Proton Release by Proteoid Roots of White
Lupin (Lupinus albus L.) Grown Under Phosphorus-deficient Conditions?
Yiyong Zhu, Feng Yan, Christian Zörb and Sven Schubert
Plant Cell Physiol. 46(6): 892–901 (2005)
12/ Soil Science Extension
North Carolina State University
SOIL FERTILITY BASICS
NC Certified Crop Advisor Training
Steven C. Hodges
13/ Organic acids in the rhizosphere and root
characteristics of soybean (Glycine max) and cowpea
(Vigna unguiculata) in relation to phosphorus uptake in
poor savanna soils
African Journal of Biotechnology Vol. 7 (20), pp. 3620-3627, 20 October, 2008
14/ Role of root derived organic acids in the mobilization of nutrients from the rhizosphere David R Jones & Peter R Darrah; Cornell & Oxford Universities
Plant & Soil Journal; 166; 247-257 1994
15/ The role of root-released organic acids and anions in phosphorus transformations in a sandy loam soil from Yantai, China
African Journal of Microbiology Research Vol. 6(3), pp. 674-679, 23 January, 2012
16/ Nutrient uptake among subspecies of cucurbita pepo L. Is Related to Exudation of Citric Acid – Martin PN Gent, Zakia D Parrish & Jason C White
American Soc. Of Horticultural Science 130(5); 782-788, 2005
17/ Root exudates as mediators of mineral acquisition in low-nutrient
environments
Felix D. Dakora & Donald A. Phillips Plant and Soil 245: 35–47, 2002.
18/ Nutrient Management for Fruit & Vegetable Crop Production
Peter M. Bierman and Carl J. Rosen
Department of Soil, Water, and Climate
University of Minnesota
19/ Protozoa and plant growth:
the microbial loop in soil revisited
Michael Bonkowski
Rhizosphere Ecology Group, Institut für Zoologie, Technische Universität Darmstadt,
Schnittspahnstr. 3, D-64287 Darmstadt, Germany - 2003
Back to Contents
Root Exudates
A while back I read this statement on the internet forums;
"I have only been looking into root exudates a couple of years now, but not something that I dwell on as I have good root systems."
This made me realize that there is a large presence of misunderstanding about the function of root excretions as they relate
to nutrient uptake and how they form the basis of natural (organic) growth.
I have written brief statements on the subject previously when discussing the microbial nutrient loop in the rhizosphere (root zone),
plant control of homeostasis & nutrient provision and the microbial hierarchy of living soil.
I read through some of the more recent publications regarding root exudations with hopes new research might help me to
give a simple explanation of the nutrient cycle related to organic acids secreted by roots and microbes. No such luck.
There are some advanced studies but they actually reveal more complexity and an overlapping role of the molecular compounds exuded
by the roots into the soil. The (basic) exudates include organic acids, amino acids, carbohydrates (sugars) and hormones.
These influence many functions from nutrient assimilation/provision to pathogen & pest control to growth promotion or prevention of neighboring plants.
There is new research which seems to validate some hypotheses I proposed around 10 years ago concerning plant roots discharging various molecular compounds (structures) to feed or attract specific microorganisms which in turn process (provide) specific nutrients or services.
In this small article I'll limit the discussion to exudates involved in the acquisition of nutrients into the soil solution where they can be up-taken by roots (plants).
I'll be attempting to express this as simply as possible for the sake of the reader and the author. Please let me know if or where I have erred.
Bear in mind that this information is not given as a growing prescription but only to help growers comprehend what is going on and to be somewhat supportive of living soil horticultural systems.
Function In The Soil
To get an important definition out of the way, in this write-up, soil solution is that moisturized film adjacent to roots where nutrients become bio-available.
This zone can be in constant flux as certain nutrients enter into it, mostly ionized and are immediately up-taken by roots and microorganisms.
Most growers have now been made aware of the meaning of CEC (cation exchange capacity), wherein positive charged cations are adhered to negatively charged organic matter or clay particles in the soil. The greater the CEC the greater the capacity to store these types of nutrients.
Furthermore, many growers know these nutrients can be released into the soil solution as (bio-available) ions by hydrogens (bonds) correlating to the positive charge (number of electrons lost) bonded to the nutrient (cation) molecule. This is the cation exchange where nutrient ions are made available for plant root uptake.
This is the power of hydrogen. Indeed the power or potential of hydrogen in the soil solution is what pH is.
What growers may not be aware of is, where these hydrogens come from. Two major sources of them are soil microbes (bacteria, archaea & fungi) and roots.
They are part of the molecular structures known as organic acids which are one of the root exudates. I'm only going to attempt discussing the nutrient acquisition role of organic acids, however they serve a number of functions, including soil pedogenosis (or development) and even as nutrients themselves.
Organic acids play a major role in nutrient acquisition for the plant, however as mentioned earlier there are some other compounds at play in the scenario.
There is some cross over between function of organic acids, amino acids and carbohydrates wherein each sometimes is microbial food or functions to release nutrients.
There are also still many unknowns. For the purposes of the situation I'm discussing, organic acids are more nutrient release agents, while amino acids and carbohydrates are more microbial food (attractant).
Please know that my interpretation is open to criticism as I endeavor to simplify the complex. I am encouraged that the unfolding pictures viewed in my mind some years back have been modestly validated.
In simple terms the plant itself excretes the organic acids which free up desired nutrients stored in soil and organic matter but it also excretes carbohydrates and amino acids that attract and feed bacteria, archaea and fungi which pump out these same (or differing) organic acids. In this way the nutrient economy multiplies for the plant, with less energy expenditure by the plant.
To try to understand what occurs when organic acids, exuded by roots and microbes, displace cations (nutrients) held by soil particles, let's first look at the net charges comprising these nutrient compounds.
Common Positively Charged Soil Cations
(can be nutrients, micronutrients and [neutral/harmful] )
calcium (Ca+2) - net positive charge; ionized by losing 2 electrons; 2 hydrogens required to release
magnesium (Mg+2) - net positive charge; ionized by losing 2 electrons; 2 hydrogens required to release
potassium (K+) - net positive charge; ionized by losing 1 electron; 1 hydrogen required to release
ammonium (NH4+) - net positive charge; ionized by losing 4 electrons; 4 hydrogens required to release
and so on.....
iron (Fe+2) - net positive charge; ionized by losing 2 electrons
manganese (Mn+2) - net positive charge; ionized by losing 2 electrons
zinc (Zn+2) - net positive charge; ionized by losing 2 electrons
copper (Cu+2) - net positive charge; ionized by losing 2 electrons
cobalt (Co+2) - net positive charge; ionized by losing 2 electrons
nickel (Ni+2) - net positive charge; ionized by losing 2 electrons
[aluminium (Al+3) - is toxic to most plant species at <5.5 pH soil solution]
[hydrogen (H+) - functions to affect pH]
[sodium (Na+) - rarely used as a nutrient; plays a role in pH and osmosis;]
Then look at the number of hydrogens bonded to the organic acids, considering that an equal number of hydrogens is required for the number of electrons to alter the compounds in order to release them as ions into the soil solution.
Some Common Organic Acids
(excreted by plants and microorganisms)
acetic acid, CH3COOH - total of 4 hydrogens
citric acid, H2C6H6O7 - total of 8 hydrogens
fumaric acid, C4H4O4 - total of 4 hydrogens
formic acid, HCOOH - total of 2 hydrogens
oxalic acid, H2C2O4 - total of 2 hydrogens
malic acid, H2C4H4O5 - total of 6 hydrogens
malonic acid, CH2(COOH)2 - total of 4 hydrogens
propionic acid, CH3CH2COOH - total of 6 hydrogens
succinic acid, C4H6O4 - total of 6 hydrogens
tartaric acid, H2C4H4O6 - total of 6 hydrogens
gluconic acid, C6H12O7 - total of 12 hydrogens
For example, by looking at the two lists above we can estimate that citric acid could potentially release 4 calcium ions, if citric acid is specific to calcium and all 8 hydrogens are exchangeable (8 divided by 2).
I've not researched information showing the specific combinations of organic acids exuded by roots and microbes to implement the corresponding release of specific nutrients into the soil solution (excepting citric acid mobilizing phosphorus & calcium). However one can see by looking at the numbers of hydrogens bonded to the various molecular structures of organic acids that there are corresponding positive charges [or numbers of electrons] on nutrient compounds which can be exchanged for (or knocked off) to ionize the molecule released into the soil solution.
"The process of gaining or losing electrons from a neutral atom or molecule is called ionization." ~ [boundless.com]
There are also anions which are negatively charged nutrient molecules. These are not stored in most soil types.
In most soils anions are mobile through the soil solution and are supplied ongoing by fertilizers or as they are degraded from organic matter and minerals and held within bodies of microbes until excreted or otherwise transported to the plant. There is involvement of organic acids in acquisition of anions in similar fashion to cations, particularly of insolubilized phosphate.
Common Soil Anions
chlorine (Cl-) - net negative charge; ionized by gaining 1 electron
nitrate (NO3-) - net negative charge; ionized by gaining 3 electrons
sulfide (S2-) - net negative charge; ionized by gaining 2 electrons
sulfate (SO42-) ....and so on
phosphate (PO43-).
molybdenum (MoO4)-
The Role of Predators
Beyond or on top of this method of nutrient assimilation is another step up of the nutrient economy initiated by the plant. Earlier I mentioned the plant attracts and feeds bacteria, archaea and fungi (with excretions of carbohydrates and amino acids) to in turn release the same organic acids. These organisms feed on some of the ions as well so one could think that the plant is stupid to encourage this competition, however as the bacteria and archaea multiply, protozoa (flagellates, ciliates & amoebae) are attracted to the rhizosphere (soil solution).
They begin feasting on the bacteria & archaea and dividing as quickly as every two hours [or even less?]. Nature's clever hedge fund has set up a system wherein the energy requirement for these soil protozoa is 10 to 40 percent of what they intake. What (energy) they expel is 60 to 90% of a multiplied ionic form nutrient, of course bio-available to the roots of the plant.
Bacterial feeding nematodes attracted to the grazing area contribute similar nutrient value although with a lesser return on investment.
The fungi serve to degrade matter and materials to a form available to other organisms and some form mycorrhizal or endophytic relationships with the plant.
*********************************
To Ponder;
Does the predation cycle use a similar exchange system as we see in the cation exchange between plant roots and soil/clay particles? Perhaps in reverse so the microorganism's needs vary from those of the plant?
**********************************
These cycles can take place for up to 24 hours (or more?) or may terminate within a couple of hours.
***********************************
To Ponder;
Because of all this hydrogen spilling into the soil solution, I am led to realize that the pH must fluctuate in different areas and at different times according to the needs of the plant, organisms & soil.
If using natural growing techniques, hypothetically this is controlled by interplay between root excretions and microbial activity. I therefore wonder what effect, control of the overall pH in soil has beyond a gross scale target where soil is very acidic or alkaline.
Can one accurately check pH levels in the soil solution and is the time/nutrient phase it is tested in, a factor?
***********************************
Boron, The Weird One
I've got to mention briefly that during researching for this little essay, I discovered a number of seemingly contradictory and incorrect (outdated) statements about boron and its assimilation by plants.
Boron originates from cosmic rays along with two other elements found on earth lithium and beryllium. [This makes for some interesting reading for those interested; think black holes; or God's pixie dust]
Most information seemed to state that boron was just there, mobile in the soil and taken up easily if present and toxic if there is too much. My first clue was that boron (B2O3) carries a mix of positive and negative
ions so requires more energy to ionize it to a form assimilated by roots. I could not resolve within my puny brain logic, how it is taken into the plant.
Some further looking revealed that it is actually the borate ion (BO3-) or boric acid (H3BO3) which is the form of boron taken up from the soil as an uncharged molecule.
These are mostly stored in humus materials of organic matter. They are moved across (through) the cell wall membrane via protein transporters.
These proteins were revealed through research within the last 16 years or so. [another fun research project for some]
So guess what? Uptake of boron is not a passive undertaking. It is regulated by plants. You might ask, then how do plants acquire boron toxicity from soils with high levels of the boron constituents?
One needs to ponder again whether this could be the result of human interference in one form or another.
Closing Statement
Like I said earlier, this is not meant to be any form of growing prescription. I've been accused many times of saying that growing is all about organic matter and microorganisms and even that one must have a microscope to grow adequately. Not so.
I've always stated that I'm just about trying to explain what is going on, to the best of my ability and when it comes to gardening, I say, be all inclusive so long as you are doing no (to little) harm.
It's not about minerals OR microbes and compost, it's about minerals, organic matter AND microbes.
Many growers are in it to push the envelope, some for fun, like giant pumpkin growers, some for profit or bragging rights, like cannabis growers looking for those giant dense 'buds' [pot language for flowers].
The thing is; giant pumpkin growers don't eat their produce (I think).
Many have learned that natural growing produces higher quality vegetables, fruit and herbs (equivalent of nature farming, not the commercial meaning of natural).
If you want your tomatoes or cannabis to increase in yield go with caution and read, watch and listen. Lest we forget the tobacco growers who thought phosphorus fertilizer was their key to the vault; the price was high levels of polonium 210 and lead 210 stored in tissues of glandular trichomes which some hypothesize is the true cause of lung cancer in smokers.
I hope I've managed to convey at least the basic function of root exudates for nutrient acquisition and that with natural growing the plant is not a sponge to just suck up the ratios of ingredients provided.
One must just ensure that all components are provided in adequate amounts and in a stable form degradable by the organisms.
Examine all information, including mine, with skepticism.
Resources Used (in no particular order)
Organic acid behavior in soils – misconceptions and knowledge gaps
D.L. Jones1,3, P.G. Dennis1, A.G. Owen1 & P.A.W. van Hees2
Plant and Soil 248: 31–41, 2003.
Root exudation of sugars, amino acids, and organic acids by maize as affected by nitrogen, phosphorus, potassium, and iron deficiency
Lilia C. Carvalhais, Paul G. Dennis, Dmitri Fedoseyenko, Mohammad-Reza Hajirezaei, Rainer Borriss, and Nicolaus von Wirén ~ J. Plant Nutr. Soil Sci. 2010, 000, 1–9
Aliphatic, Cyclic, and Aromatic Organic Acids, Vitamins, and Carbohydrates in Soil: A Review
Valerie Vranova, Klement Rejsek, and Pavel Formanek
The ScientificWorld Journal Volume 2013, Article ID 524239
Organic acid induced release of nutrients from metal-stabilized soil organic matter – The unbutton model
Marianne Clarholm, Ulf Skyllberg, Anna Rosling
Soil Biology and Biochemistry; vol. 84, May 2015
Gluconic acid production by bacteria to liberate phosphorus from
insoluble phosphate complexes
M. Stella and M.S. Halimi ~ J. Trop. Agric. and Fd. Sc. 43(1)(2015): 41 – 53
Sodium as nutrient and toxicant
Herbert J. Kronzucker, Devrim Coskun, Lasse M. Schulze, Jessie R. Wong
& Dev T. Britto ~ Plant Soil (2013) 369:1–23
Interaction of micronutrients with major nutrients with special reference to potassium UJWALA RANADE-MALVI
Institute for Micronutrient Technology, Pune - 411 048, India
Karnataka J. Agric. Sci.,24 (1) 106-109) 2011
Aluminium Toxicity Targets in Plants
S´onia Silva ~ Journal of Botany; Volume 2012, Article ID 219462
Role of proteinaceous amino acids released in root exudates in nutrient acquisition from the rhizosphere
DL Jones, AC Edwards, K Donachie, PR Darrah ~ Plant & Soil, Jan. 1994
Amino acids in the rhizosphere: From plants to microbes
LUKE A. MOE ~ American Journal of Botany 100(9): 1692–1705. 2013
BC. Open Textbooks - Introductory Chemistry
Michigan State University Extension
University of Hawaii - Soil Management Manoa
Arkansas State University - Department of Chemistry & Physics
pubchem.ncbi.nlm.nih.gov
http://www.boundless.com - chemistry
Elcamino College - http://www.elcamino.edu
GPB Media - gpb.org
http://www.sciencegeek.net
http://www.endmemo.com
http://www.agion.de
The Only Three Heavy Elements In The Universe That Aren't Made In Stars by Ethan Siegel - Forbes - July 1, 2015
Separation and Analysis of Boron Isotope in High Plant by Thermal Ionization Mass Spectrometry
Qingcai Xu, Yuliang Dong, Huayu Zhu, and Aide Sun
International Journal of Analytical Chemistry Volume 2015, Article ID 364242
Unravelling the interactions of Boron with natural
organic matter (NOM) on a molecular level
András Gáspár ~ Thesis presentation 2008
Lithium-Beryllium-Boron: Origin and Evolution
Elisabeth Vangioni-Flam, Michel Casse and Jean Audouze
astro-ph/9907171 June 1999
Effect of Composted Organic Matter on Boron Uptake by Plants
U. Yermiyahu, R. Keren, and Y. Chen ~ SOIL SCI. SOC. AM. J., VOL. 65, SEPTEMBER–OCTOBER 2001
Boron transport in plants: co-ordinated regulation of transporters
Kyoko Miwa and Toru Fujiwara ~ Annals of Botany 105: 1103–1108, 2010
So You Wanna Build A Compost Tea Brewer
Terms:
* = degree(s); CT = compost tea; ACT = aerated compost tea; O2 = oxygen; CO2 = carbon dioxide
DO2 = dissolved oxygen; CFM = cubic feet per minute; PPM = parts per million
There are several ways to make your own compost tea brewer which may not produce the equivalent results to some commercially available models but should provide you with a microbial extract you can apply to your soil and plants. When I first started messing around with brewers, I experimented with what we had lying in our various junk heaps around the farm; cast-offs from buying the wrong part at the plumbing store, outdated irrigation systems, left over pipe, dead vehicles and other modern broken things. Therefore, if you are a junk collector like me, you may already have much of what you require to build a compost tea brewer.
First of all I’d like to make it clear that most aquarium air pumps don’t produce enough air to use in a container larger than 1 gallon when considering making an aerated brewer. So don’t even try the 5 gallon pail with the aquarium pump idea everybody is passing around. You need a minimum 0.05 CFM (cubic feet per minute), open flow of air and an optimum 0.08 CFM per gallon (US) or higher to make aerated compost tea (ACT). ACT should have the DO2 sustained at or above 6 PPM. Generally, aquarium pumps produce around 0.02 to 0.16 CFM. Another generality is that 25 watts of power usually produces 0.75 to 1.0 CFM in diaphragm air pumps. The wattage is usually marked on the pump which will help you figure out the approximate output. I’ll cover more on air pumps later.
In the following I will outline some simple methods of building a variety of compost tea makers. I am not going to discuss anaerobic methods at this time. Later on I may add some sketches.
1/ Stir Method: The cheapest way to make compost tea is the old fashioned way. Just add compost to clean, non-chlorinated, water (above 65 degrees F. recommended) and stir like mad with a clean stick or whathaveyou. I’d recommend using about 3 to 5% compost by volume of water and stir it up as often as you can over an 8 to 12 hour period. Some people do it over a 24 hour period and also add some foodstock like molasses, fish hydrolysate and kelp. You can experiment with different times and ingredients and decide for yourself. If you have a microscope, check it out. When you feel that you have a completed compost tea (CT) you can remove it in several ways. If you have just used a 5 gallon pail you can simply let the particulate matter settle and pour the clearer CT off into watering cans or your sprayer.
Filtering;
You can place a submersible pump into a mesh bag as a screen, drop it into the tank (barrel, pail) and pump the CT out. I use a regular cheap sump pump for this with a 800 to 1000 micron mesh bag (about the size of window screen) See the testing I did; Does Microbial Life Survive Pump Impellers? . You can purchase mesh bags at www.aquaticeco.com or make your own. Likewise, you can filter the CT by placing the same size screen over top of another pail and pour or siphon the CT through the mesh into the other vessel. If residue builds up, stop and clean off the mesh. As residue builds up it stops the passage of the microbes you want. Never run CT through a pipe constrained filter unless essential as part of your irrigation system or spray rig.
2/ The Venturi Method: If you only have a water pump and wish to make a compost tea brewer you can inject air into the water by using a venturi. I have provided a sketch and text showing how to make your own or you can purchase them from http://www.aquaticeco.com . Basically the venturi creates a vacuum which interfaces with the water as it passes by, sucking air and mixing it with the water. It is quite an efficient method of oxygenating water. If you have a really tough water pump which does not clog, like a trash pump, you may run this type of brewer without a mesh extractor bag. Most are going to want to use a mesh extractor, so I recommend TEEing your water line downstream from the venturi with one return line suspended above the water and the other return line going into the mesh extractor. Undoubtedly you will require a valve to regulate the flow so all of the water does not just take the easiest route to the pipe suspended over the water. To build a CT brewer beyond the stir method, some basic knowledge of fitting plumbing parts and pipes together is essential, as well as some engineering instincts. If you are not up for this just save yourself the aggravation and buy a brewer. You may use your imagination for a mesh extractor. For a small brewer of 100 gallons or less, 400 microns is an ideal mesh size. Sometimes for large brewers which may run for several days to establish a functional nutrient cycling consortia a larger mesh size like 800 µm may be a better choice. This is because, as noted above, the mesh may clog up a little over time. A friend of mine successfully brewed CT using this method in a 5000 gallon brewer for many years. He used 2, barrel sized mesh extractor bags sewn from landscape cloth. He ran a return line into each bag, which was ¾ full of compost and tied off each bag tightly around the pipe so nothing could get out the top. These were dropped into the water (with his tractor) and 2 other return pipes pumped in oxygenated water. You can use your imagination to create mesh extractors, dependent on the size of your brewer, the materials at hand and what works for you. You can even create a basket which is partially above the surface to prevent particulate escape. These systems are not great for extracting and growing fungal hyphae but they produce bacteria/archaea and protozoa just fine.
The Gas Exchange;
The reason for suspending the other pipe(s) above the water is so it splashes into the water, breaking the water’s surface tension and additionally pushing more air into the water like a water fall or running river does. The surface tension of water is unique in its toughness; it surpasses that of oil. When I first started experimenting with the venturi method I had the return pipe submerged. The effects were profound. As the water filled with air, generated by the venturi, the water level rose, even over flowing my 1200 gallon tank. At the time, I thought this was a good sign that I was oxygenating the water. Sure, I was getting air in but was not getting the maximum dissolved oxygen possible with my system. Later when I learned that gas exchange means, ‘trading one gas for another’, I realized that the surface tension must be broken for the optimum gas exchange to occur. In this case, we are trading carbon dioxide (CO2) for oxygen (O2) or dissolved oxygen (DO2). CO2 must make way for DO2. In water, CO2 has two ways of being dissipated (of which I am aware). It is either used by organisms, like water plants or it must escape at the surface interface. In a brewer we have no plants and the microbes we are growing use O2 and create CO2, so the CO2 must escape at the surface. Because of the high surface tension of water, if we break the surface, this escape or release is facilitated and we improve the efficiency of our CT brewer. Once we started suspending the return pipe above the surface, providing a hardy splash to break the surface, we had no further over flows and the DO2 increased. NOTE: This principle applies to air driven brewers as well. The better the surface tension is broken, the better the capacity to contain DO2 in the water.
3/ The Vortex Method: There are many who claim that running water in a vortex pattern comprised of multiple mini vortices changes the properties of water beneficially. I remain dubious but open-minded. You can form your own opinion on this subject. One thing a vortex brewer is very good for is ensuring a full circulation of all the water and compost added. There can be no ‘dead zones’; none of the feared anaerobic pockets!! There is no point to considering the use of a mesh extractor with a vortex brewer unless you conceive of some genius method of suspending a mesh container in the center of the flow. Therefore this design is for those of you who don’t mind using compost in free suspension and deal with the particulate matter later. A vortex action in a CT brewer is pretty much dependent on the shape of the vessel used, combined with the direction of the input flow ‘nozzles’ or pipe ends and finally on the ability of the design to empty from a centrally located opening at the bottom of the vessel and the return of the water emptied, to the top of the vessel, to repeat the trip. Shapewise, you must use a round configured vessel. The most efficient shape is a cone shape with a drain hole at the bottom. Rather than go through a complex description of how to construct an air driven vortex brewer, I’m including this Internet link which illustrates a design by Steven Storch which he has offered up to the public;
http://www.subtleenergies.com/ormus/tw/turbo-vortex.htm One with engineering instincts will come up with a variety of ways to modify this design. For example this design can be transposed to a 50 gallon sized barrel with a drain hole placed in the bottom. You would of course need a larger air pump and need to set the barrel up on blocks or legs. These systems produce a full compliment of microbes (bacteria/archaea, protozoa and fungal hyphae).
One can also create a vortex brewer using a water pump to return the water to the top of the vessel again. Very handy if that is what you have laying around in your junk pile. The advanced thinkers will have already mindfully jumped to the idea that including a venturi with a water pump driven vortex is going to increase its efficiency exponentially. Well….at least a lot. Give yourself a gold star, a pat on the back, a chocolate cookie. Bear in mind, that if you use a water pump you will limit fungal hyphae extraction and growth.
3a/ Simple Airlift - Vortex: done my way
I've had many requests to provide a simple design for an airlift brewer. This sketch of a simple design cone bottom tank brewer can be applied to just about any size brewer. Just don't start selling them or I'll have to sue you.
If you wish to create a vortex using this design make sure you use a round shaped tank and position the return nozzle (elbow) so it is directional to the flow desired. This can be reversed by twisting the elbow and tweaked by using a short length of pipe as an extension. I'll try to post some photos shortly.
4/ Bubble Blowers; There are 2 basic styles of commercial bubble blower CT brewers. What I mean by bubble blowers, is that their function depends on just that; blowing bubbles into the water, into a mesh extractor or both. They do not actively move the water, aside from the effect of the bubbles. Because of this, I find it a paradox that they refer to their units as AACT (actively aerated compost tea) brewers to separate themselves from only, aerated compost tea (ACT) brewers, which supposedly just blow air into water. This remains a mystery unto me. I won’t name these brewers because they include almost every commercial brewer available, except mine of course, which should be separated from those by being called an AAACT brewer (giggle). No offense; just kidding around.
Anyway, back to business. A very simple method you can use to make an aerated CT brewer is to use some rigid PVC thin walled pipe (not schedule 40 because it is difficult to make tiny holes in) of approximately ½ inch to ¾ inch size. Rigid pipe is better than flex pipe because it holds its shape, can be cleaned more easily and is easier to drill and saw. Use a straight piece which is approximately as long as your proposed tank is high, joined to a 90* elbow, then following the dimensional circumference of the bottom of your tank build a roughly round hexagon or octagon or whateveragon alternating with PVC fittings (45* or 11*, 22* to 30* if you can find them http://pvcfittings.com ) and short lengths of pipe, terminating just before you hit the elbow which the long pipe slides into. Over the end of this last piece of pipe in your whateveragon slide a cap. None of this needs to be glued (usually) because we are not dealing with high pressure and the whole thing can be taken apart for easy cleaning. We now need three more things. An air supply, an air input interface with the pipe and diffusers. A diffuser is an interface between air and water which ‘diffuses’ of course, air into the water. No matter what name people give it, like orifice or air stone, hole, slit or slot, it is still a diffuser. The smaller the diffuser opening within the capacity of the air pump to push air through easily, the greater the efficiency at raising and maintaining the dissolved oxygen. Therefore you want to put the smallest holes or slits possible at intervals in the short pieces of pipe you used to construct your whateveragon. If you have an electric drill you can drill 1/16th inch holes. You can try cutting slits with a razor knife or very fine hack saw or other blade. A hacksaw cuts around 1000 microns width. I get machined slots which are 254 microns. Make your openings so they are coming out the bottom angled towards the center to begin with. (The pipe is not glued so you can rotate them). For your first trial only put a few air openings in each length of pipe (e.g. 2” spaces). We want the air traveling all the way to the end of the whateveragon. Now to try it out, I guess we better get some air happening.
First of all, for your air input you need to match air tubing with your air pump and get a threaded barbed fitting that the tubing fits over and a slip X female threaded coupling to go over your long straight piece of PVC pipe which goes down and joins to your whateveragon. This, you may need to glue.
I have provided a rudimentary representative sketch to help illustrate the basic construction >click here
A Word About Diaphragm Air Pumps;
If you are going to buy a pump to run your aerated CT brewer I now (as of Feb 2015) recommend the Elemental line of commercial air pumps. Like ECO commercial air they are a combination piston and rubber (diaphragm) pump but they are quieter and seem to out perform the ECOs for the same price range. The Elemental 951 gph which we are using with our Mini-Microbulator outputs 2.5 CFM and the 1744 gph which we will be using with our 50 gallon airlift Microbulator measures an average 5.3 CFM (ECO 5 is 4.0 CFM). On top of that, these pumps are painted and it seems there is a higher standard applied to their manufacture. In the USA you can purchase this line through buildasoil.com. If there is enough demand we will sell these pumps in (from) Canada
I can also recommend Hailea 9730 pumps (2 CFM max.) which you can purchase from www.aquaticeco.com and other places. These are solid, long lasting pumps and I know other commercial brewers use them for 50 gallons but I just can’t recommend them for more than 30 gallons. If you use one for a 5 gallon unit it will last virtually forever. All of these pumps come with a little threaded brass fitting for screwing into the air output. DO NOT USE THESE! Put them in your parts drawer. These constrict the air and reduce your CFM by at least 20%. Rather, find tubing which slides over the nipple into which the threads are tapped. In the case of the Eco Plus 5 and the Hailea, 5/8ths inside diameter works. Slide the air tubing over and secure with a gear clamp. The Eco Plus has a very short nipple so I score the metal with a couple of swipes with a hacksaw to create barbs for the tubing to grip. You can find tubing at a building supply like Home Depot or Rona in Canada. I use the braided reinforced stuff which does not kink. Always try to keep your pump at or above the surface of the water so it does not siphon back if the power fails.
Now that we have our air supply you can slide the tubing over the barbed fitting air input on the end of your straight piece of PVC and fire her up. Ooops! Forgot the spring clamp. You can use a spring clamp to pinch the long PVC air pipe to the edge of your tank at the top. This keeps the hole thing from floating and you can adjust the distance your whateveragon is from the bottom. Spring clamps are like giant clothes pegs http://www.leevalley.com/wood/page.aspx?c=1&cat=1,43838&p=41712
http://www.hobbytool.com/springclamps.aspx
I’m sure you can find them at Home Depot too or you may think up another idea (like a ‘C’ clamp).
Okay fire up the pump and fill up your tank (pail, barrel) with water. Watch the amount of air coming out of the openings you made. What we want is air coming out right to the end of the whateveragon and even dispersal all around and we want really broiling water bubbling up to the surface. The reason I suggested angling the openings on the bottom towards the center of the tank is so it would sweep right up from the base. You can raise it closer to the surface to get a better look at how evenly the air is coming out. You can also just put the air tube end in the water, right to the bottom so you can get an idea of your air potential and how much should be coming out of the holes you made. You don’t want to restrict the air flow. If you feel comfortable that you need more air coming out start adding more openings (on top), beginning at the cap end on the top of the pipe and working your way around towards the air input. You’ll get the hang of it. If you screw up, no biggy cause you are using really short pieces of very cheap pipe, not glued and you can redo and experiment to your heart’s content.
This is very similar to the KIS 5 gallon brewer (a very efficient little brewer; buy one if you don't like doing this) so their compost brew kits will be ideal to use with this. You can use this system with compost and feedstock in free suspension (added directly to the water) or in the case of a 5 gallon set up you can probably get away with placing your compost and solid food into a mesh bag tightly tied up and floating around in the water. The turbulence may keep it suspended. You could put some fishing floats or ping pong balls in it to be sure it won’t sink.
If you wish to use an extractor bag with a larger brewer, then you can use a variation of the set up previously described, except that you have a PVC air line entering your (tube/sock shaped) mesh extractor bag with diffuser openings close to the bottom of the bag and with a cap on the end of the pipe. This pipe should go very close to the bottom of the bag. You will need to tie off or fashion a lid for the extractor bag or keep the top above the water surface. As stated previously, 400 microns is the optimum sized mesh to use. You may purchase a variety of mesh bags from http://www.aquaticeco.com . You can experiment with the number of diffuser openings which provides sufficient agitation. These types of systems depend upon the agitation of the compost against the mesh, caused by the air, to extract the microbes from the compost. Some systems have no additional air diffusion outside of the mesh extractor, while others incorporate one or more additional diffusers. One could TEE off from the air line, one diffuser going into the mesh bag, the other into the water. A valve to regulate the air flow would be necessary in this case. Alternatively one could use two air pumps. One could combine both designs, using a whateveragon diffuser and another pipe going into the mesh extractor.
Diffusers;
One could incorporate good quality glass bonded diffusers if one did not wish to mess with PVC pipes and making their own diffusers. These diffusers are resistant to break down by microbes and can be cleaned with muriatic acid (but are not environmentally friendly to clean). They are called Sweetwater medium bore diffusers and are available at http://www.aquaticeco.com . They are far superior to homemade PVC diffusers in terms of sustaining DO2 because they produce finer bubbles . There is no truth (that I have seen) to the statement that fine bubbles damage some microbes.
Anaerobes;
Many people are overly anxious about having any anaerobic microbes in their CT. If you have a tremendous number of ciliates in your CT, or if it stinks to high heavens, there is a likelihood that your CT has gone anaerobic and you should toss it. However, I would not worry about seeing a healthy number of ciliates (if you have a microscope), especially if there are also high numbers of flagellates and/or amoebae. Additionally anaerobic (facultative and obligate) bacteria and archaea occur naturally in the soil and other environments and their existence is part of the balance of nature so don’t worry if you have a few in your consortia.
Cleaning;
You should clean out your brewer after each use, especially the extractor bag if you use one.
Conversions;
1 US gallon = 3.78 litres (liters)
1 US quart = 0.946 litre (liter)
1 micrometer or micron (µm) = 0.000039 inch (39/100000ths)
For converting mesh to microns: http://chemplazaonline.com/meshsizecoverter.aspx
I think I’ve covered the basics. If anyone has any suggestions or if you notice any errors, please speak up.
Back to Contents
Some Photo, Video and Linked Resources for Organism Identification:
Vorticella (<5 MB) This is little video of a Vorticella ciliate
Here is Part 1 and Part 2 PDFs of some photos and notes I put together to assist folks with idendifying soil, compost and compost tea microbes. Please use these PDFs freely for educational purposes. Part 1 includes bacteria, flagellates, amoebae, ciliates and fungal hyphae. Part 2 covers nematodes and rotifers.
Here are links (which I hope remain current) to Internet resources which will assist in microbial identification.
Mastigophora - Flagellates
http://protist.i.hosei.ac.jp/PDB/Images/Protista/MastigophoraE.html
Ciliophora - Ciliates
http://protist.i.hosei.ac.jp/PDB/Images/Protis
Sarcodina (Sarcodia) - Amoebae
http://protist.i.hosei.ac.jp/PDB/Images/Protista/SarcodiaE.html
http://now.ifmo.ru/amecol/frames.htm
http://amoeba.ifmo.ru/guide.htm
You can find good images of testate amoebae by googling Edward Mitchell + testate amoebae
Fungi Images & Info
http://www.uoguelph.ca/~gbarron/index.htm
http://www.mycolog.com/index.html
Actinobacteria (mycetes)
Digital Atlas of Actinomycetes [now referred to as Actinobacteria]
http://www.actino.jp/DigitalAtlas
Lots of cool organisms by Wim
http://www.microscopy-uk.org.uk/mag/indexmag.html?http://www.microscopy-uk.org.uk/mag/wimsmall/smal1.html
Please inform me of any dead links.
Back to Contents

My name is Tim Wilson. I am a self-taught researcher/scientist. I do not possess a degree but did study a wide range of courses at university, some of them post-graduate courses I was allowed into based on my knowledge level at the time. I learned scientific thought and method from a great scientist and friend Barry Beyerstein who suddenly passed at a much too young age of 60.
Many of you will know me by my contributions to various discussion forums on the web. Presently I reside in southern British Columbia, Canada.
I'm doing ongoing research in soil biology.
Please email me if you have questions or comments at; thegoodjob@hotmail.com
Stuff I'm Selling

It includes some examples of;
1/ What microbes you should see in a finished compost tea,
2/ Bacteria,
3/ Flagellates,
4/ Ciliates,
5/ Amoebae (3,4 &5 comprise the three groups of Protozoa),
6/ Fungal hyphae,
7/ Yeast cells,
8/ Nematodes,
9/ Rotifers and
10/ Compost Examination.
For those of you without microscopes the DVD offers a good visual representation of what is going on in your compost, vermicompost, compost tea and soil.
BUT now for $28 USD
I have been able to render the complete DVD set into a down loadable mp4 video file. It is quite large download at 850 MB so it may take a long time to download, Those with poor download situations may need to decide the best action to take. The resolution is not quite as good as on disc but still surprisingly good.
Make payment by credit card, debit card or Paypal.
Instructions for purchase and download;
To purchase the download please pay $28 USD to my PayPal account microcosmictim@gmail.com (copy and paste into your paypal send money spot) Then email me at thegoodjob@hotmail.com to let me know you paid and I'll email you the download. If required I can email a request for payment (invoice) Please note that my Paypal email is different than the one for communication.
*********************************************
********************
SAMPLE VIDEO CLIP
Click on the following video link (4.7 MB) to download a 'wmv' (Windows Media Video) to your computer. Depending on your download speed it may take a while. It is an example of what sort of footage is included in the DVD.
Video link
******************
NOTE RE VIDEOS; If you are unable to view some of the videos displayed on this site and have a Windows operating system, you may need to initiate, dowload or update Windows Media Player.
This does not apply to the download videos
What Folks Have Said About the (video) DVD Set;
"Hi Tim,
I want to let you know that I have thoroughly enjoyed your video, it was very well done. In the last part of the first DVD, I found it funny that I was actually drawn in and was rooting for that protozoa that was on the final stages of it's life. I have watched it over a few nights, and during the day on my way to and from work on the bus, I have been reading Teaming With Microbes. They complement each other very well and helped me to understand a whole lot more than when I was laboring through biology classes in grade 12. I wish this kind of material, in such an easy to understand format was around when I was in grade school."
Deighton King
"I want to back up Tim's suggestion that you consider a purchase of his DVDs. If you have a scope it is a valuable aid right up there with Dr. Elaine's manual. Way to go Tim!"
Jeff Lowenfels; Author; Teaming With Microbes Available at Amazon & KIS
"Jeff is right -- they are truly fabulous and I think are essential to have -- even if members here have a microscope because there's simply no way your set up matches Tim's or can reveal what Tim has done here. Not even close! What an introduction to the Microcosmos! Wonderful job, Tim. And finally, if I may, this is the perfect real time, real world companion piece to our book, "Teaming With Microbes"
Wayne Lewis, Alaska Humus Co., Anchorage; Author; Teaming With Microbes
"I'll second the endorsement for Tim Wilson's DVD.It's a great educational tool for students of soil biology and compost teas. As you may have gathered, Tim has a better-than-average microscope setup so the microscope footage is both clear and fascinating. He captures moving images with brightfield and phase contrast microscopy.The DVD is organized section by section according to microbial group. The microscopy clips are accompanied with voice-over explanations by Tim. Some of the images of ciliates, flagellates, nematodes, rotifers, fungal hyphae provide high definition closeups. The comments by Tim provide insight to microbial groups and their characteristics as well as practical know-how on microscopy (often with a sense of Canadian humor, eh?).
Good job, Tim, and congratulations on this DVD that's been years in the making."
Steve Diver
Back to Contents
Here is an easy to make 50 gallon airlift - previously sold as The Poorboy
The Video Data
********************************************************************************************************
Back to Contents
The Mini-Microbulator Airlift Microbial Extrapolator
(Aerated Compost Tea Maker) [US Patent 7972839 B2]
Ask at KIS Organics https://www.kisorganics.com

Watch this video to see the bioreactor in operation and to learn how to use it. Please note that even though we do show how to filter the 'tea' for spraying, it is not necessary when applying to the soil and it is better to not filter for this application.
How It Works
Like its 50 gallon big brother it is loosely patterned after the airlift bioreactors used in laboratories for multiplying microorganisms. This is exactly what we wish to accomplish; to extract microbial spores from compost or vermicompost and multiply them as living bacteria/archaea, flagellates, naked amoebae, ciliates and fungal hyphae; sometimes rotifers and nematodes are present. This is what I call a 'microbial extrapolation'.
This diversity of microbes is responsible for cycling nutrients in a living soil which feed the roots of plants. There are also some studies showing disease/pathogen suppression using these liquid microbial suspensions.
There are some compost tea manufacturers and sellers who would like you to believe that the diversity required is somehow complex and elusive, except with DNA testing. Certainly these species of specialized bacteria and archaea can only be discerned via DNA (or through other complex testing), however thankfully we do not need to know their names to see most of them with 400X magnification and the protozoa and fungi comprising the diversity are even easier to see. Ask yourself how much money these people are requesting for their pretty brewers and do they present any data at all or just testimonials?
Please see this video for representative data regarding the microbial populations created using the Mini-microbulator.
Generally a batch is completed in around 36 hours but this time can be shortened by pre-feeding the compost or vermicompost to be used. This is outlined in my article More on Compost Tea 2013 along with some basic recipes. The dissolved oxygen (DO2) of a finished batch has been over 7 PPM for us with water TDS at around 75 PPM but as high as 9 PPM DO2.
Guaranteed Performance
There is always a range of variability when making aerated microbial extrapolations (aerated compost tea [ACT]) Even when we make ACT on our little farm using vermicompost from the same pile we get slightly differing results under the microscope every time.
Variations like temperature, changes in water, microbes in the atmosphere, moisture content of compost, subtle changes in foodstocks, exposure to light, time of day, perhaps barometric pressure and perhaps even the phase of the moon could all slightly effect the microbe population multiplied. Therefore one cannot guarantee standard results, however I can guarantee that the device, used as instructed, will extract and multiply microbes as well as or better than, the high priced compost tea machines on the market.
Cleaning
We recommend cleaning the inside of the pipe after making a batch. It can be pulled apart where not glued and flushed with fresh hot water and pipe brush. It takes about 2 minutes and prevents residue build up. There is no need to clean out the airline if the device is left running until removed, as in the video.
Other Uses
The device can also be used for making fertilizer teas from botanicals/herbs such as alfalfa meal, kelp meal, comfrey, etc. We have also used it to mix up trichoderma spores, Actinovate (Streptomyces lydicus) and homemade knotweed extract to apply to pathogens. It could likely be used for thoroughly mixing many types of fertilizers, even salts.
**********************************************************************
Download PDF plans to build your own Mini-Microbulator - $7.00 USD
Aftter Payment Click on 'Return to Merchant' and the PDF Plans will open for you to save.
A PDF reader software is required
**********************************************************************************************
Back to Contents
The Microbulator 50; A 50 (US) gallon compost tea brewer ONLY AVAILABLE AS OF END OF MAY 2017 FROM KIS ORGANICS
https://www.kisorganics.com/collections/compost-tea-brewing-systems/products/50-gallon-microbulator-compost-tea-brewer
[US Patent 7972839 B2]
Video Clips of Operation
Details & Questions
Where Is Your Data
Ugly But Efficient & Cheap!
Features:
* Active flow-circulation induced by air alone; 6.3 gallons/minute
* Efficient gas exchange system for excellent dissolved oxygen maintenance
* Works with or without an extractor bag (extractor unit included)
* Two different ways to configure apparatus
* 5.6 CFM piston combined with rubber diaphragm air pump with 1 year warranty (upgraded in 2015 from Eco to Elemental commercial air pumps of a higher quality and flow)
* Can be dismantled and cleaned in under 40 minutes, including the barrel
* Sturdy parts used in manufacture
* Specially designed machine slotted PVC diffusers
* Operational instruction on private youtube link included
* No barrel provided
* See it in operation > View the video clips below
Data: See the video clips below for microbial data and basic operation.
Details, Details NO LONGER AVAILABLE THROUGH THIS SITE - ORDER THROUGH; KIS ORGANICS
https://www.kisorganics.com/collections/compost-tea-brewing-systems/products/50-gallon-microbulator-compost-tea-brewer
Since 2007, I have been taking orders for the 50 Gallon Microbulator compost tea brewer or as I affectionately call it, a microbe extractor and multiplier (bioreactor).
While visiting Tad Hussey at Keep It Simple Inc. (compost tea brewers) in Seattle, I showed him video footage of the Microbulator 50 operating. He commented that it might be ‘not pretty enough’ for some consumers. When I told him my expected price range he coined the phrase ‘ugly and cheap’. I decided to incorporate that into my sales pitch mantra ‘Ugly but Cheap and Efficient’. After all; the beauty of a John Deere tractor is in the eye of the beholder but as we farmers all know ‘nothing runs like Deere’. Tad has decided to offer the Microbulator 50 through his website. He is also selling a specialized nutrient pack (Pro Kit) and compost just for this brewer.
The Microbulator 50 works with or without an extractor bag. That decision is the owner’s, based on the planned uses, application method and coarseness of the compost used.
Now, how does this work and what makes it different than other commercial brewers on the market?
My design, unlike other commercial brewers I have seen, does not just blow air into water or into the extractor bag but actively circulates the water while charging it with oxygen. This is done using only an air pump. No water pump is involved. This is accomplished by a diffuser housing fixture I designed and built which incorporates the diffuser inside an 1 ½ inch PVC pipe [1.25 inch industry size]. The whole 50 gallons of water is cycled through this pipe every 8 minutes at a measured flow rate of at least 6.3 gallons per minute. The water is drawn from two opposing sides of the bottom of the tank, pushed past the diffuser, while being injected with O2, up the pipe and through the return nozzle suspended about 2 to 5 inches above the water’s surface, falling back into the liquid, pushing O2 into the water by breaking the surface tension barrier, facilitating the release of CO2 from the tank and the absorption of O2 (gas exchange). This is not unlike the action of a waterfall or flow form. This action pushes the oxygenated water into the body of water further raising the dissolved oxygen content. Because the water intake openings are located at opposing sides at the bottom of the barrel, a current-like flow is created and maintained so any still areas of water are highly unlikely. The release of CO2 is essential to create space in water for the absorption of dissolved oxygen and the only way for CO2 to be released in a CT brewer is through the surface. At the same time a large slotted PVC diffuser is infusing the whole body of water with air. Oxygen is absorbed by the interface of the bubbles created on the way to the surface and the surface tension barrier is broken again by the bubble turbulence, allowing the further release of carbon dioxide and the maintenance of dissolved oxygen. By this means, there are three interfaces where O2 is being injected into the water or compost tea. The real champion for raising dissolved oxygen is the airlift. Research has shown that an airlift can increase the dissolved oxygen capacity up to ten fold!
This highly efficient yet very simple method is generally able to raise and maintain the dissolved oxygen (DO2) content of fresh well water having a TDS/EC of 21 to 30 PPM and temperature of 18 C to 21 C (65 F – 70 F) at least 3 PPM (parts per million) above the natural DO2. Using the same water within the same temperature range, with; 4% compost/vermicompost, 0.75% black strap molasses, 0.25% kelp meal and 0.063% fish hydrolysate, the DO2 is maintained at 8.8 to 9.8 PPM up to a 48 hour brew time. Please note that these are maximum amounts of compost inputs and not recommended for people brewing without microscopes.
The circulating action, the force of impact with the water’s surface along with the air from diffusers provides sufficient agitation to break the microbes loose from their binding spots in the compost. The continuous flow provides a more homogeneous dispersal of oxygen and microbes, avoiding still water areas where potential undesired microbial life may develop. Once free swimming or bound to smaller particles, the bacteria, archaea, yeast cells and fungal hyphae graze on the feed supplied and multiply or grow.
Maintaining a reasonably high rate of dissolved oxygen in the body of water is essential to the device’s efficiency for extracting and multiplying the beneficial microbes, consisting of; archaea, bacteria, fungal hyphae, flagellates, amoebae, some ciliates, yeast cells and yeast fungal hyphae. Because of the constant cycling, microbes are fairly evenly distributed throughout the tank. To get a sample, simply hold a container under the return nozzle.
With Extractor Unit;
The Microbulator can be used in free suspension or with mesh extractor bag configurations. A specifically designed diffuser is used in the bag while the internal diffuser continues circulating the water/tea breaking the surface tension. Both configurations are good for multi-purpose compost tea but using the extractor radically reduces particulate matter in the tea and is good to use for foliar disease suppression. The extractor should be used if you are using coarse compost with pieces between 1/2 inch and 1 inch cubed. See the demo video below.
The highest microbial numbers are going to be developed using the device configured for the compost placed in free suspension but if one requires the extractor for a reduction in particulate matter this configuration provides a comparative alternative.
Free Suspension;
On the farm we usually use the Microbulator 50 without the extractor, remove the apparatus once the brew is complete, allowing the particles to settle to the bottom, lower in a submersible pump just above the level of the spent compost/particles and pump out the clearer compost tea. Alternatively one can place the pump in a mesh bag (fly screen size) and drop it in or simply scoop out the compost tea with a pail or watering can. Afterwards dump out the thick leftover slurry onto your soil or compost pile. If you are using vermicompost any worm eggs/capsules/cases remaining will still hatch once in the soil or in a non-hot compost pile.
What did you use and why?
Pump: We have in 2015 upgraded to an Elemental 1744 commercial air pump out putting an average 5.6 CFM flow. It is quieter than the Eco Plus and more powerful.. I was first using the Hailea 9730 (rated at 60 LPM) but the air flow was just not strong enough to support 50 gallons of compost tea. Some other manufacturers use it for 50 gallon brewers anyway. The flow on each pump is tested with our flow meter prior to being shipped. To cease the wandering around and help with the noise I’ve included a little rubber damper mat with each kit.
IMPORTANT NOTE: I did not use a check valve for the pump because it prohibits air flow so the pump must be placed above or at the same level of the water surface to prevent back flow if there is a power outage or the pump is turned off.
The Air Tubing; The air tubing is heavy duty 7/8 inch braid reinforced clear vinyl. I tried the regular clear stuff but it kinked too much and wore quickly. Each kit includes enough tubing for the device to insert into the barrel plus 6 feet for lead to the pump. You can decide where to place the pump and trim the excess accordingly. Remember the pump must be above or at the same level of the water surface.
Clamps: We use stainless steel pinch clamps permanently affixed, combined with stainless steel gear clamps.
Air Control Valve; We used a brass plumbing valve to control the air flow between the large diffuser and return flow nozzle. We tried cheaper plastic valves but they didn’t cut it.
Piping; I decided on PVC pipe because it is inexpensive, easy to clean, can be fitted together without glue in low pressure applications like this or can be glued when necessary (as are a few of the pieces). I am using 1 ¼ inch diameter pipe because it is the right size to accommodate the flow needed for the 50 gallon brewer. One small disadvantage is that sometimes when disassembling one must use pliers or vice grips to pull apart a pipe and fitting. NOTE; The industry sizing of the pipe is 1 1/4 inch but the actual inside diameter is 1 1/2 inches.
Diffusers; We use only, machine slotted PVC diffusers which I designed and get cut at a machine shop. Many of you will know that I wanted to stop using the glass bonded stone type diffusers because the muriatic acid used to clean them is not environmentally friendly. Via research I succeeded, by altering the depth of the slots and lengthening the large diffuser, in improving the PVC diffusers so as to match the dissolved oxygen maintenance of the glass bonded diffusers. The slots are 254 microns in width. There are three of these diffusers included with the brewer.
Brass Fittings: We use brass fittings throughout, where applicable for purposes of longevity and quality. Where the brass must be adhered to PVC we have used a high grade non toxic epoxy.
Barrel: As mentioned previously please check with me for barrel dimensions and potential sources. I use a translucent barrel, as I believe this encourages the growth of phototrophic microorganisms.
Extractor; The extractor bag we are using is 400 microns mesh size, 24 inches long and 7 inches in diameter. There is a stainless steel supportive ring sewn into the top and a rubberized poly cap, with an entry hole for the diffuser. The unit is hung over the PVC pipe with nylon line. I tested many sizes of mesh prior to choosing 400 microns. I tried 200, 250, 300, 400, 800, 1000 microns mesh sizes.
Bungee Cord; A rubber bungee cord is included which holds the unit in place and prevents floating, as it is filled with air charged water. The hooks are the perfect size to secure the positioning of the control valve and large diffuser. This beats trying to use weights inside the tank.
Back to Contents
How about cleaning?
The whole unit can be dismantled and cleaned in under twenty minutes. Add ten minutes if you use the bag and another ten for the barrel. The unit should be removed from the compost tea while still pumping air for best results. This prevents back-flow into the diffusers and into the air tubing. While pumping air, particles and bacteria will have a more difficult time entering the air system. The whole unit then pulls apart and can be cleaned quickly with fresh water, a scrub brush or pad and a bottle/pipe cleaner (available at Wal Mart, etc.) If you clean the unit right after use, generally you can use water alone but occasionally you may wish to use hydrogen peroxide or bleach. It is not advised to use bleach on the extractor bag but you may use it on the pipe and tubing. You should not need to clean the inside of the air tubing if you prevent back-flow. The extractor bag should be flushed under fresh water immediately following use and can be hand washed using a peroxide product like Oxy-clean.
What about brew times?
I am confident that the Microbulator 50 will match or surpass any other commercial brewer as far as production of numbers and diversity of microbes and DO2 maintenance, given equal parameters of water, temperature, compost, foodstock and time. If you wish to brew for 24 hours, the Microbulator will perform appropriately to extract and multiply the expected microbial types and numbers for that brew time. I recommend a brew time of around 36 to 44 hours if you are striving for a functional consortia of nutrient cycling microbes, consisting of bacteria/archaea, fungal hyphae and flagellates and/or naked amoebae. It is very important to be aware that you need good quality compost/vermicompost and feedstock to get good quality compost tea. Temperature and water quality must also be considered. Really!; there can be so many variables and the best way to know at what hour your microbes are at the optimum level is by microscopic examination.
Please see the video clips below for data from different brew times.
Back to Contents
Data
Where is your data?
I’m a great believer in pictures as documentation and exhibition so I have posted some video clips here which show the Microbulator 50 in operation and some microscopic videos recording the microbes extracted and grown at several different brew times. The videos are viewed via youtube and others using Windows Media Player (until I load them to youtube) which comes with most PC operating systems. You need to download them to watch and it may take some time based on your computer and Internet connection. In many cases I have offered a choice of high or low resolution clips. Obviously if you have a very slow connection choose the smaller file.
SFI TEST RESULTS
Okay, okay! All you people out there who are believers in seeing the SFI lab test results, my friend Barry Draycott at Tech Terra Organics http://www.techterraenvironmental.com gave his consent to post the results of tests he had done on ACT from his Microbulator 50. In a way it was kind of a double blind in that SFI did not know what sort of brewer they were testing. Here it is SFI Microbulator Test
I still believe in video to show the volume and diversity of microbes in microbial tests. If you examine the attached SFI test results it shows the active bacteria above range, the active fungal above range yet the the active fungi to active bacteria is low. Does anybody know where these parameters come from?
Video Clips
In Operation;
The Microbulator 50 demo video;
Microbes;
Video Data for The Microbulator 50;
Without The Extractor - Free Suspension Configuration;
The following video clips were shot to record microbial extraction and multiplication at varying time periods of a brew while using the Microbulator 50 in the free suspension configuration, that is with 4.5 liters of vermicompost and solid feedstock added directly to the water without the use of the extractor. Our own vermicompost was used which was fed a base of very old cow and horse manure/wood shavings compost, sphagnum peat moss and kitchen scraps. Both brews were started at a temperature of around 18 C (65F). In the first brew the vermicompost was not mixed with anything to activate it. For the second brew the vermicompost was mixed with oat flour 20:1 and covered for around 120 hours prior to using it. Both brews maintained great DO2 levels to 60 hours; Brew #1 – 9.0 PPM DO2; Brew #2 – 8.9 PPM DO2. I do not recommend brewing for 60 hours and longer unless you have the instruments to check your brew or unless circumstances dictate the necessity. I have however included video footage recorded at this time period.
I am very pleased with the results demonstrated by the brewer as well as our by vermicompost. The following video clips are narrated and fairly self explanatory.
Microbial Identification:
In one instance I refer to an amoeba as naked, although I’m not entirely sure whether it has a shell (test) or not. I am researching to identify it. You will see some flagellates which are joined together like a bunch of balloons. These may be Choanoflagellida Salpingoecidae (diploeca) or Kinetoplastida Bodonidae Cephalothamnium cyclopum or of a related group within the major Mastigophora group.
NOTE RE VIDEOS; I am gradually converting videos to Youtube but most are still Windows Media. If you are unable to view the videos and have a Windows operating system, you may need to initiate, download or update Windows Media Player.
For WMV please click the links below to download video clips. In most cases there is a choice of a large higher resolution file followed by a smaller lower resolution file.
Brew #1 Vermicompost Free Suspension; Not mixed with Oat Flour;
10 hours;
18 hours clip 1;
18 hours clip 2;
18 hours clip 3;
36 hours
42 hours
60 hours
Back to Contents
The following videos must be downloaded to view.
Brew #2 Vermicompost Free Suspension; Mixed with Oat Flour
10 hours 5 MB
18&36 hours 6 MB
42 hours clip 1; 7.5 MB
or 3.3 MB
42 hours clip 2; 5.9 MB
60 hours 6.2 MB
With The Extractor;
The video clips below illustrate the microbial densities at various time periods in a compost tea using the Microbulator 50 configured with the mesh extractor bag in place. In this configuration the large PVC diffuser was placed inside the mesh extractor while the return nozzle still splashed oxygenated water/tea onto/into the surface. Both brews included the use of our vermicompost which had been mixed 20:1 with oat flour and covered for about 120 hours prior to use. The video clips are narrated as before.
Brew #1 was made using our vermicompost with fish hydrolysate and kelp added.
DO2 at 60 hours - 8.9 PPM
10 hours 4 MB
18 hours 5 MB
36 hours 8 MB or 4 MB
42&60 hours 5 MB
Brew #2 was made using our vermicompost with fish hydrolysate, kelp meal and black strap molasses. Adding the molasses was kind of an impulsive afterthought and for a regular brew I probably would not repeat this when also using fish when the compost has been treated with (fed) oat flour. There was an over abundance of feedstock resulting in a very high bacteria/archaea population. The result was a brew which took 60 hours to consume the feedstock and complete. It was interesting though and definitely microbially rich. DO2 at 60 hours – 7.3 PPM
10 hours 10 MB or 5 MB
18&36&42 hours 9 MB or 4 MB
60 hours 7 MB or 4 MB
Back to Contents
Other Batches with different Compost;
Compost tea batch #1 at 22 to 24 hour brew time; 11 MB (high res); 5 MB (low res)
at 44 hours; 4 MB
Compost tea batch #2 at 46 hours; clip 1; 8 MB (high res); 4 MB (low res)
Clip 2; 5 MB (med res)
Clip 3; 8 MB (high res); 4 MB (low res)
Clip 4; 10 MB (high res); 5 MB (low res)
_________________________________________
back to contents
Plans - DIY 50 Gallon ACT Maker $15 USD
NOTE: These plans are designed to be flexible with the pipe size used and brewer size (50 to 300 gallons)
therefore do not expect a replication of the commercial Microbulator. The diffusion chamber and diffusers
are described but not recommended due to complexity and expense. Troubles? thegoodjob@hotmail.com
Build your own 50 gallon airlift bioreactor (ACT maker) using these downloadable plans.
The plans include
- a written description
- diagrams
- explanatory photos
- links to private videos
Payment is by credit card, debit card or Paypal
Important Instructions;
After completing payment stay on the payment page, scroll down and click on
'Return to Merchant' and the main PDF document will be downloaded instantly. Make sure you save this PDF to your computer.
This documents contains links which download the sketches and contains a link to a private Youtube playlist.
$15 USD I do not receive email through paypal!!
*********************************************
Back to Contents
General Microscopy Helper Video; For Download (480 MB)
Price $10 USD
I'm providing here for download a 58 minute excerpt from the DVD set which was provided with the microscopes we sold.
It is made for that microscope but the information is applicable to brightfield compound microscopes in general.
The topics/chapters covered are;
1/ General Assembly of the Microscope
2/ Use and Function of the Condenser
3/ Using the Mechanical Stage
4/ The Objectives
5/ The Trinocular Head
6/ Using Barlow Lenses
7/ Field Light use and Centering
8/ Specimen and Slide Preparation (compost/soil smear, using pipette, placement of coverslip, etc)
9/ Focal Distance With No Coverslip
10/ Focusing - First Time - Troubleshooting
11/ Creating Contrast Over Organisms Closing Condenser Iris - Shadowing Technique (enhances view)
12/ Compost Examination
13/ Centering the Condenser and Kohler Illumination
Some may find parts of the video too basic, boring and redundant. That is what fast forward is for :)
This is a 480 MB download so depending on your download speed it could take some time. Please email me if you have trouble.
Price $10 USD Make payment by credit card, debit card or Paypal.
Instructions for purchase and download; To purchase the download please pay $10 USD to my PayPal account microcosmictim@gmail.com (copy and paste into your paypal send money spot) Then email me at thegoodjob@hotmail.com to let me know you paid and I'll email you the download. If required I can email a request for payment (invoice)
Troubles? thegoodjob@hotmail.com
back to contents
Microscopes Unfortunately due to the rising US dollar we are unable to provide this microscope at a decent price NO LONGER AVAILABLE
I am leaving up this information for interest and in the event things change. (Feb 2016) I am truly sorry.
I worked almost everyday for 2 months to create custom filters to enhance the images viewed through the microscopes and am now satisfied with the results. Each microscope will come with these custom designed filters as well as a custom made 20X objective which the manufacturer made for me. The enhancement produces images which are similar to those seen using phase contrast and differential interference contrast (3D). The effects are particularly effective using the 20X objective as you can see in the video footage posted below.
The brightfield images are very good, equivalent to or better than higher priced microscopes like the Leica CME. The brightfield (true) resolution is actually somewhat better than when using the enhancement devices. The enhancement effects refraction and diffraction of light with the use of different colors as well as black to block certain portions of light. This provides a contrast making the subjects stand out more to the human eye. The method I have used is, I believe different than that previously employed by other microscopists so I’ll regard it as proprietary, at least for now.
My goal, like my other endeavors has been to provide a functional yet inexpensive quality microscope to support microbial based horticulture which I believe is of great benefit to the farmer, landscaper and home gardener. I maintain it to be just as much a tool as a shovel, hoe or lawn mower. If things change in the future I'll do what I can to do so again.
Accessories: I've listed below where one can get replacement electrical components and accessories.
Barlow lenses .
1/ The 3X multiplier Barlow lens is available at www.surplusshed.com I've discovered that two of these work great in the eyepieces of the trinocular microscope. Please note that although the 3X multipliers are cool, they are not necessary. Basically if using the 10X objective, they increase the magnification from 100X to 300X and the 20X objective from 200X to 600X. They are not effective with the 40X objective due to the light requirements of this objective.
3/ The replacement bulb for the trinocular microscope is a 6 volt 20 watt 2 pin halogen
known as a type JC G4 (4 mm between pins) Below are some sources for replacements;
http://www.lightbulbsdirect.com/page/001/PROD/HalJCG4/Q20G46V
http://www.specialtyoptical.com/osram64250fheesbmicroscopehlxhalogenlightbulb6volt20watt.aspx
https://www.homesciencetools.com/bulb-20-watt-6-volt-halogen
4/ For replacement fuses you require a 1 Amp – 250 Volt glass type fuse 20 mm long.
You may find them here at Tessco
http://www.tessco.com/products/displayProductInfo.do?sku=17460&eventGroup=4&eventPage=1 This is a wholesale company but they have a consumer phone line where you can order by credit card. The phone number is
1-866-837-7265 and you must ask for part # SKU; 17460
Alternatively you may find single fuses available at the automotive parts store, like NAPA or Lordco.
Other Interests;
1/ If you are looking for a carrying case, MicroscopeNet on Ebay seems to have some aluminum foam filled cases which may work; just check the measurements carefully. You can also make your own carrying case by custom cutting foam to fit the scope into a plastic tool box something like this> http://www.greatscopes.com/act018.htm
.
2/ If you are interested in big cameras and microscope adapters check out Martin Microscopes http://www.martinmicroscope.com
3/ I have given up carrying the inexpensive cameras because the last shipment was unsatisfactory. You folks who got cameras from me got the last of the good ones. I may do some research and find some other inexpensive cameras worth carrying but for now I recommend searching the Internet and hope for the best or get something good through Martin Microscope for more money. The main problem I found with the cheap cameras was the low frame rate and inability to convey microbial motion.
Back to Contents
Microscope Description:
Trinocular; binocular with camera port; nice inter-pupil adjustment;
Eyepieces: 23 mm extra widefield 10X & widefield 16X
Achromatic Objectives: 4X, 10X, 20X, 40X
Mechanical Stage (much larger than small scope)
Coaxial Course & Fine Focus; 0.002 mm increments
Brass Gears
Abbe Condenser 1.25 N.A. with swing-out filter holder; rack & pinion adjustment
Kohler Illumination
Lamp; 20 watt halogen; adjustable intensity
Anyway, here is the trinocular microscope;
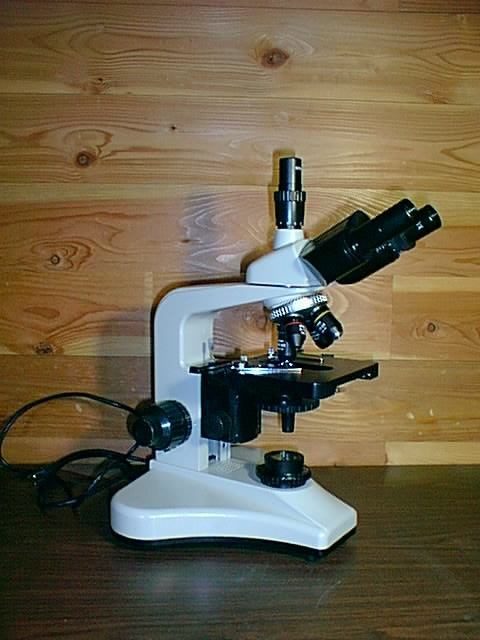

Brightfield Images
Here is brightfield video footage shot through the microscope. Be aware that looking down the eyepiece and microscope tube is always higher quality than with a camera; also the camera magnifies the image and reduces the field of view by about 1/3rd.
4X objective 3MB 10X objective(a) 4MB 10X objective(b) 3MB 20X objective 4MB 40X objective(a) 3MB 40X objective(b) 4MB
Enhanced Images;
Here is some enhanced image video footage shot through the microscope using my proprietary method and some others. The 20X objective images are most impressive and the number one feature of the scope.
20X objective a/ 4MB b/ 3MB c/ 4MB d/ 4MB e/ 3MB : 10X objective a/ 4MB b/ 2MB
Photos through trinocular scope;


Four variances; Brightfield, Shift Phase, Rheinberg, Darkfield (10X objective)


Brightfield & Enhanced


Back to Contents
Tests, Observations & Postulations
Subcontents:
A look; Sphagnum Peat & Alaska Magic
Do Microbes Survive Impeller Pumps?
Yelm Brewer Trials and Lab Tests
Canadian Sphagnum Peat Moss & Alaska Magic (Humus);
Here is a look at a sample of Canadian Sphagnum peat moss Premier brand and a sample of Alaska Magic which is purported to be humus from Alaska. Both were purchased in Washington State and I examined them in a temporary lab situation using my portable microscope and laptop computer. In the first set of video clips we see the samples hydrated with distilled water and spread out on a microscope slide to have a look at the leaf and cell structure. In the narration for the Sphagnum peat moss I mistakenly describe it as 20X magnification (I meant the 20X objective) when it is actually 250X plus the camera lens effect. You can see that the two plant substances appear virtually identical which leads me to hypothesize that, although they may come from different geographical locations, they are both primarily composed of the same matter. I can provide lengthier and more inclusive video clips to interested parties. I do apologize for the variance in volume on the video clips. Please note that they may take some time to download to your computer and they play in Windows Media Player.
Click here (9.46 MB) to view the Canadian Sphagnum peat moss sample or here (4.15 MB) for a smaller version.
Click here (7.52 MB) to view the Alaska Magic sample.
In the second set of video clips we see footage of samples of Sphagnum peat moss and Alaska Magic mixed with distilled water and a couple of drops of black strap molasses to ‘wake up’ the organisms and left to sit. The Sphagnum footage was captured at 42 hours and the Alaska Magic at 24 and 60 hours. I apologize that I was not available for the other time periods for the Sphagnum. Now that I know that Premier brand Canadian Sphagnum peat moss is no different in the USA than in Canada I can run more extensive tests in my home laboratory. I brought a bag of Alaska Magic home with me. In the video clips we can see that both substances are emergent with a goodly amount of microbial life, as is to be expected with Sphagnum peat moss in my experience. There are people, purported to be experts in horticulture who report Sphagnum peat moss to be void of microbes. I believe the Dirt Doctor used the phrase ‘dead as cutters nuts’ whatever that means. I believe the evidence I have produced here speaks for itself and I believe growers could consider Canadian Sphagnum peat moss (Premier brand anyway) as a less expensive alternative to boost microbial life in certain circumstances, such as aerated Compost Tea. I have confirmation from an expert that the plant matter I have identified in Alaska Magic is in fact Sphagnum peat moss. My observations indicate that this is a what Alaska Magic primarily consists of.
Click here (8 MB) to view part A and here (8 MB) for part B of the 42 hour ‘fed’ Sphagnum peat moss sample or click here (6.55 MB) for a smaller slightly different version
Click here (2.56 MB) to view the 24 hour ‘fed’ Alaska Magic sample
Click here (4.40 MB) to view the 60 hour ‘fed’ Alaska Magic sample
I have done an updated test on Premier brand sphagnum peatmoss in July 2012. Again I mixed a small amount of bone dry randomly purchased sphagnum peatmoss (approx 2 teaspoons) with distilled water (approx 100 ml) and around 1/5th of a ml of black strap molasses. I observed this 'culture' over a period of 4 days. The peatmoss was labelled Premier ProMoss. You may see the video results here;
Back to Subcontents
Does Microbial Life Survive Pump Impellers?
2007 Test With 1200 gallon (US) Brewer;
We made an attempt to run a test to record the effects on microbial life when distributing Compost Tea (CT) through an impeller pump, irrigation lines, shrub head sprinklers and a cheap hand operated sprayer. One objective was to grow fungal hyphae in the CT to see how it tolerated the impeller pump and sprinklers but we failed to do so. We did see the growth of bacterial structures which are about the same volume as fungal hyphae (roughly speaking) so we decided to proceed using the bacterial structures to get some estimate of how fungal hyphae might survive the ride. See below for a similar test with fungal hyphae.
The pump we used is an impeller irrigation pump; 2 horse power; 20 PSI; 65 gallons per minute.
Our water line is 1.25 inches reducing to 3/4 inch. The strainer baskets
on our overhead shrub head sprinklers are about 500 to 600 microns
(just guessing; may be larger). These sprinklers create a fine mist
and are great for coating leaves.
Besides the preliminary 27hr sample I looked at and recorded 4 sample types;
The video clips presented are comprised of the best of quite a number of clips recorded.
1/ Sample from 1200 US gallon brewer; low active bacteria; very high
immobile bacterial 'biomass' (very large bacterial complexes); high
numbers & diversity flagellates click here to view video (9 MB)
2/ Sample through pump and water line: could see the effects of the
impeller pump as some of the bacterial structures were broken or
malformed but many remained intact. Flagellates were about the same;
Click here to view video(5 MB)
3/ Sample through pump, water line and shrub head sprinklers: about the
same effects as through the water line except the flagellate
activity seemed down a little. Click here to view video (4 MB)
4/ Sample taken right from brewer and sprayed through one of those hand
operated spray bottles set on mist; this, surprisingly had the most
devastating effects. The bacterial structures were mostly torn up
and many flagellates were killed. Click here to view video (6 MB)
I'm going to need to do a repeat trial but my thought is that if you have
hyphae that break up in the application process, unless they are
mashed, they will likely continue to grow in the soil if the
conditions support them. The same can probably be said for spores which are put off by hyphae grown.
Repeat Trial: 2008
Using the Microbulator 50 rather than the 1200 gallon brewer as previously attempted, I brewed an ACT heavily populated with fungal hyphae, utilizing our fungal inhabited vermicompost fed with oat flour.
I have succeeded with a 10 hour brew which was very heavily populated with fungal hyphae. I have demonstrated/observed that fungal hyphae complexes survive intact after passing through 1/ a mesh strainer of approximately 800 to 1000 microns, 2/ a low pressure impeller pump, 3/ a sprinkler strainer basket and 4/ a shrub head sprinkler (all one pass).
The fungal hyphae complexes averaged 3 microns in diameter ranging to 6+ microns and some which survived the pump and sprinkler spanned several 250X fields of view. I used a cheap ancient sump pump to run the test.
I think you can rest assured that a low pressure impeller pump will not significantly damage biology in compost tea.
I have recorded my data to video via microscope/computer interface and the video is available here for download (plays with Windows Media Player) > 6 MB
Back to Contents
Rambling Dissertation on Yelm Field Trials for Brewer Prototype
Only read this if you are ready for a lengthy rambling dissertation. I begin with my excursion to the Yelm Earthworm farm for a field trial of my brewer design but diverge into laboratory techniques and their foundations.
I traveled to Yelm, Washington in July, 2007 to visit the Yelm Earthworm and Castings Farm and do a field trial of my brewer design at a location close enough to get a fresh sample to the SFI labs at Corvallis, Oregon.
At Yelm;
The first thing I did before setting up the brewers was to check the DO2, temperature and the TDS/EC (totally dissolved salts {solids}/electrical conductivity) of their well water. The DO2 (dissolved oxygen) was 6.8 ppm, somewhat lower than ours at around 9 ppm. Challenge number one. Challenge number two came in a TDS reading of 93 ppm. You may recall my report that our water usually reads around 21 ppm. This does not mean there is something wrong with their water. It probably is high in mineral content but it does mean the capacity to sustain DO2 is diminished somewhat. The temperature of their water comes out of the ground at 65* F (Note; * = degrees). I was mulling over in my mind how to alter the compost and foodstock ratios to accommodate these readings when the largest challenge yet, presented itself in the form of the barrels which they had for me to use. They were very tall and almost football shaped with the points cut off. I had no idea that plastic 55 gallon barrels came in different shapes. Because my device has a base shape which must sit on the bottom of the barrel and has an air tube plugged into it at the bottom, the pressure applied to the stiff tubing and the restricted surface area made for a poorly balanced situation. At home we use a weight, which is a ‘U’ shaped PVC structure filled with gravel to hold down the device; once there is air flowing through it, it wants to float. Well, I don’t know if water has variant buoyancy properties at different elevations but the water at Yelm seemed to buoy the device despite the weight. We had to put rocks in ziplock bags which we balanced on the return pipe of the device to hold it down. I already knew at this point that I was going to have to market the device with a tank or give strict measurements and instructions to those wishing to get and adapt their own tanks. I also realized the weight idea is a no go and would need to secure the device with a strap across the tank. I thought about scrapping the trial at that point but talked myself into persisting since I had traveled so far and the SFI lab was only 4 hours south.
I was wishing I had stuffed one more thing in the little Montana van, my white barrel. I’m sure I already had looked suspicious enough at the border crossing stocked with microscope, two weird looking cameras, empty pill bottles for test tubes, rubber gloves, vials filled with dark liquid, strangely configured PVC pipe, tubing connected to brass valves, ziplocks of compost in coolers and a beard and messy hair to boot. A 55 gallon barrel may have pushed it over the edge. Thank goodness for my USA passport. Without it I would never have made it.
Well we set up two barrels in preparation for brewing. Brew ‘A’ would use the Yelm Earthworm farm vermicompost/thermophilic compost blend and Brew ‘B’ would use my horsemanure/shavings vermicompost. Our compost normally presents a good quantity and quality of fungal hyphae in a Compost Tea (CT) and a high number of bacteria with flagellates at varying blooms throughout the brew. After getting things pretty much balanced and running the brewers for a few hours without ingredients, the DO2 was up to 9.5 ppm. Because of the high TDS readings I decided to reduce the compost used from 4% to 3% or 4.5 liters (18 cups) and the black strap molasses to 0.65%, the kelp meal I left at 0.25% but reduced the fish hydrolisate to 0.05% (which had got quite smelly at this point). I added the ingredients and we were off and running. It was around this time that we heard through the news that a heat wave was on its way. You know; the one which broke all the records in the North West. I thought to myself; ‘Of course, Murphy’s Law’.
At the Yelm Earthworm farm they are open from 8:30 AM to 5 PM and keep the big front gate locked when closed so there was no way to check on the progress of the brews in the ‘off’ hours. When I drove in the following morning and checked the brews ‘B’ device had tipped over and was not operating in correct fashion. I straightened it up and checked the DO2 at 3.9 ppm. Damn! Of course it had to be the brew with my compost. The ‘A’ brew was okay at 7.7 ppm. This was at the 21 hour mark, three hours away from drawing my first sample. The ‘A’ sample at 24 hours was still maintaining at 7.7 ppm DO2 and 72* F when I drew it. Through the microscope tube it exhibited a good amount of active bacteria at about 5% with about 7 to 8% total bacteria. I was disappointed that there was still some fish smell present. (maybe my fish was too old) Generally the CT was as I expected at this stage prior to the protozoa explosion. To see a short video of A24 click here (5 MB). The ‘B’ sample had crept back up to 5.2 ppm DO2. The temperature for both brews was 72*F. Through the microscope tube B24 presented with a good quantity of active bacteria at about 3 to 4% and very thick total bacteria at about 20 to 30%. There is some fungal hyphae present albeit of a smaller diameter than we normally see from this compost and quite coated with bacteria. I attributed this to the mishap with the device tipping but the other variables could also be at play. I only saw 1 lonely flagellate representing the protozoa population. To see B24 click here (14 MB) or here (6 MB). As usual these clips are viewed in Windows Media and may take a while to download.
Note; In the narration for b24 I use the word ‘mature’ for fungal hyphae when I mean more developed.
By this time the heat wave had hit full blast and the little room where I had set up my temporary lab became a torturous sweat box in the afternoon. This is where I was set up to examine the Alaska Magic, Sphagnum peat moss and various other substances people were bringing me to look at. I became very appreciative of the drive back to the motel at 5 PM with the windows wide open until the A/C kicked in.
The next morning the hour had arrived, or rather the 44th hour when I had decided to draw the final samples and head to the SFI lab at Corvallis. I drew the samples and had a microscopic look at them, recording the data to the computer under the witnessing eye of Kelan, one of the farm owners. My goal, primarily was to create a CT optimum for nutrient cycling in the soil. Brew ‘A44’ appeared excellent for this purpose. The DO2 was at 7.0 ppm despite the temperature being slightly over 74*F. Looking through the microscope I conservatively counted 90 flagellates per 250X field of view and as is to be expected, the number of active bacteria was radically reduced to less than 1% by the protozoa but the total bacterial level was still good at about 5%. I did not however see any amoebae. When you view the short video clip of A44 by clicking here (7 MB) bear in mind that the camera only shows about 1/3rd of a field of view. The ‘B44’ sample was the same temperature 74*F+ but the DO2 had never recovered and remained under 5.0 ppm. Through the microscope tube B44 exhibited a tiny bit of fungal hyphae but this was a really brief exam so there could easily have been more, there was less than 1% active bacteria but very high inactive bacterial biomass for a total of around 12 to 15%; there were about 2 flagellates per 250X field; quite low. Click here to view B44 (10 MB).
I re-examined the 24 hour samples as well to decide what all I would include to get tested at SFI. The A24 sample appeared to have degraded and there was not much bacterial activity so I decided to save some money and exclude it. In reality the only really good sample for my purposes was A44 but I wanted to see what the SFI report would say concerning the fungal hyphae in B24 and B44 so I loaded the 3 samples into a small cooler and hit the road.
As, I have relayed previously I had a telephone conversation with Elaine Ingham about 10 days prior where I understood that I would be able to have a quick look at one sample using one of their scopes just to see how the flagellates had survived the 4 hour transport. In the same conversation I had understood her to say that the plate culture method was not used for counting protozoa in Compost Tea samples, contrary to what the lab manager had told me. Rather, they use the direct count or direct determination to ascertain quantities of all organisms in Compost Tea samples. When I arrived at the lab I kinda expected to go in with the samples and watch the technician put the sample on the slide, have a peek, explain to her my reason for submitting the ‘B’ samples and head back to Yelm. I had witnessed this done for someone else several years ago when I spent a day in the SFI lab. I was told to wait for the technician. After about a half hour+ I was beckoned into the lab by the tech and there was a slide prepared and on a microscope set up for incident light fluorescence, what one uses for observing stained or autofluorescing organisms. At first I glanced down the eyepiece but then asked if there was not a scope I could use with transmitted light to observe the survival and activity of the protozoa. The tech replied “What!?”. (I’m not sure which part she did not understand or if she was just startled.) She then said the protozoa would not be observable for 5 days as they were being plated out. I replied ‘That’s silly, I observed around 100 active flagellates per 250X field a few hours ago. They don't need plating.’ I wish I had not blurted out ‘silly’ but the heat of the moment and mounting disappointment was overwhelming me. The technician suggested I speak to the lab manager. I did spend a few fruitless moments engaged in conversation with the manager trying to ratify what Elaine had told me. He determined that I had misunderstood Elaine, which I guess is correct and that all Compost Tea samples are plate cultured to count protozoa. I blurted out, again, that such a count is not valid. He rightfully corrected me that, in my opinion it is not valid and I corrected my statement to reflect this meaning.
I left the lab feeling rather frustrated and confused but, despite having spent almost $400 on testing methods different than anticipated I held out hope that in the big picture the learning experience would be worth the price paid. The rush hour traffic through Portland was ugly.
The next morning at the Yelm Earthworm farm I relayed my experience and predicted that the utilization of the plate culture method would show the CT which is high in protozoa content as being lower because the CT had already produced protozoa to the optimum and many of the resting cysts had already excysted (hatched). The CT sample which is low in protozoa content would likely show a higher count after being plate cultured because there is more potential for protozoa multiplication as they have yet to populate to an optimum level and there may be resting cysts yet to excyst.
Upon returning home I contacted some people knowledgeable in microbiology and several laboratories to try to get their take on this method for counting protozoa. I could find none that thought the plate culture method made any sense for counting protozoa and one lab concurred with my prediction theory. There were also suggestions that the plate culture medium may not grow the same set of protozoa present in the CT as is. The consensus was that if they were asked to do a count of protozoa in such a medium (CT) they would immediately prepare several slides, do a live count and calculate an average. Most suggested they would use a hemacytometer or other counting chamber (slides with pockets and etchings of precise dimensions for counting microorganisms).
I thought something is not right here. Maybe I’m missing something. I had always agreed with Elaine Ingham’s assertion that the way to get a more accurate estimation of live microbes was through direct determination and that plate culturing was unreliable because it misses most of the organisms and because it projects the growth rather than showing what is present now. I have admired her stance on this amidst criticism but now, apparently her lab is using this very method for protozoa counts, while other labs are advocating direct determination. Does it make sense to use direct determination for one set of microorganisms while plating out another?
Back to Contents
The following excerpts are from Elaine Ingham or are associated with her; I wish to make it clear that I intend no enmity towards Elaine. I hold her in high regard. Her knowledge level eclipses mine. I seek only clarity and verity.
1/ SFI Website
http://www.soilfoodweb.com/03_about_us/approach_pgs/c_01_understand_why.html
Species diversity
Species diversity is the same in compost and the tea made from that compost. Species diversity in compost is higher than fumigated or sick soil. But at least one plate count microbiology lab is giving out data suggesting that compost has lower diversity than bad soil and that “ok” tea has less diversity than bad compost. It is clear that plate count “diversity” methods are not effective in assessing species diversity, or species richness, in soil, compost or compost tea. Molecular methods tell us that species diversity in soil, tea, and compost, can number in the thousands and tens of thousands per gram.
Use of methods that tell you that soil contains only a few 5 to 10 species, or that compost contains only 8 to 15 species need to be viewed with a great deal of incredulity. Plate methods are missing only about 99.9% of what is actually present!
Do plate counts or direct counts assess tea quality? The clear answer is that direct counts assess tea quality, while plate counts do not. Take a look at the results (below) from a test where two different teas were used to control blight on tomato plants.
2/ Soil Foodweb Institute Australia
http://www.soilfoodweb.com.au/index.php?pageid=340
Plate methods could not differentiate between the two teas.
TSA incubated at room temperature, in aerobic conditions, measures “aerobic heterotrophs”. There was no detectable difference between the two teas using plate methods, despite the fact that Tea Two was capable of suppressing blight, while Tea One, sprayed at the same concentration, in the same conditions, did not suppress disease.
King’s B medium selects for pseudomonads, but not all these bacterial species are beneficial to plants. Enumeration indicated that there were more pseudomonads in the not-suppressive tea. Plate methods cannot distinguish whether the bacteria growing on this plate, and thus presumably pseudomonads, will be beneficial to the plant. If these values were used to measure “species richness-diversity”, the not-suppressive tea would get a higher “index” score than the tea that resulted in the plants remaining alive and producing a bumper crop of tomato later in the year.
Please note that “species richness-diversity” is not a valid name for any ecologically accepted measure of diversity. The lab that developed and uses this index will NOT explain how this index is calculated, and will not show any data that documents what relationship the index has with plant health. They claim the index is in any introductory textbook, but in fact, no textbook anywhere has a measure called species richness-diversity. Until such time as the lab using this index documents the claim that a higher index value actually means a benefit to the plant, the use of this index must remain highly questionable.
Spore-formers are determined by boiling the material in question to kill vegetative cells, followed by plating the material on TSA. Only spores or highly dormant stages of organisms survive boiling. Those spores capable of growing on TSA, at room temperature, in the particular oxygen conditions present in the plate (please recognize that oxygen exchange is reduced by the fact that the plates are covered), are then enumerated. Again, the not-suppressive tea had higher plate enumeration values. What is the relationship between what will grow on a plate, and physiological functions occurring in the soil, or on plant surfaces? These data show that there is no relationship.
Direct determinations separate bacteria from fungi. Plate media do not separate even bacteria from fungi, much less not giving an indication of what is going on with approximately 99.9% of the species present in the material plated.
Direct determinations also let you know whether protozoa or nematodes are present and performing their functions. A much clearer picture of what biology is present and performing their functions is possible when using direct determinations. Direct methods let you know if coverage on leaf surfaces is adequate. These types of assessments need to have a clear relation back to benefit to the plant.
Please note that there is no consistent relationship between plate count enumerations of “species richness-diversity” and improvement in plant growth. Plate counts do not assess diversity or activity of the organisms in the test material. An insignificant number of the actual total individuals or total species present in a sample grow on any single plate medium or set of lab conditions that it is difficult to see why anyone would continue to pretend that there is a relationship between plant growth and plate count assessments of diversity.
3/ Discussion Forum
http://lists.ifas.ufl.edu/cgi-bin/wa.exe?A2=ind0211&L=sanet-mg&P=7967
When you talk about functional groups in the soil, it is as if you think that organisms that grow on plate as active in the soil. They are not. Thus, as a method to assess function, plate counts are pitiful. As a method to determine whether a functional group exist in soil, again, plate counts are pitiful, because 99% of the individuals that might be able to perform a function do not grow on that plate.
If you want to know function, do any enzyme test. Then you know how much of that function is being performed right now. But enzyme analysis doesn't help you to know how much that function will be maintained. You can be predictive only if you know the number of active organisms performing that function now, and in ten minutes, and in an hour, etc. Plate counts don't allow you to do that. Most of the organisms that grow on any plate are dormant forms, spores, that were not active in the soil, or compost, or tea.
4/ Internet
http://www.energybulletin.net/23428.html
Monitoring the soil life
The first step in restoring the soil biology is being able to diagnose it. Since we can't look at the soil food web directly, we must rely on indirect methods. Some have suggested nematodes and springtails as indicators of soil health.
Ingham advocates a "direct count" method, in which individual organisms in a sample are counted under a microscope. Following a protocol, a trained technician counts the number of different classes of organisms (bacteria, fungi and protozoa, for example). The result is a report on the organisms estimated to be in the sample. The numbers indicate possible problems in the soil. For example, a high number of ciliates (a group of protozoa) suggests anaerobic conditions - harmful to plant life.
Other researchers have used plate counts. A soil sample is placed in a growth medium like agar, typically in a Petri dish. The number of bacterial or fungal colonies that grow from a soil sample are then counted.
Ingham maintains that this method grossly underestimates the number and variety of soil organisms. She says that the method was designed to detect and grow human disease organisms such as E. coli. In contrast, soil organisms need different conditions than the laboratory setting and growth media can provide. Only about .01 percent of soil organisms can be detected with traditional plate counts, she estimates.
5/ Discussion Forum
http://lists.ibiblio.org/pipermail/compostteas/Week-of-Mon-20020506/000000.html
Testing tea is critical - and you have to know whether the competitive organisms in the tea are ACTIVE or not. You cannot measure active organisms using plate counts, you can only measure viable organisms. There's a huge difference.
6/ Internet
http://soilfoodweb.ca/SFC-Elaine&TedArticle.pdf
To get this information, you will need to send samples of soil, compost and compost
tea to a laboratory that can provide this information. Choosing the ‘right’ lab is
important as not all soil and microbiology labs use protocols that can provide the
information that growers need to make good decisions about soil biology
management. To date peer reviewed, direct look protocols and composite databases
are only available at the worldwide soil foodweb labs in the USA, Canada, Australia,New Zealand South Africa and soon England and Belgium. Plate culture laboratory protocols cannot provide this information and miss 95% of the biology in soil because most soil organisms cannot be grown in an artificial lab environment.
7/ In The Compost Tea Brewing Manual 4th Edition, Elaine advocates direct count methods for determination of the microbes present in compost teas.
End of Excerpts:
SFI Test Results:
The SFI test results did come by email. You may view the tests here in PDF format A44 B24 B44
A44 – When we examine the results of bacterial count overall my estimations as to general quantity (quality) from above (active bac low <1% but total okay 5%) seem to roughly concur with the SFI results (active bac. low; total bac. good). SFI reports the bacterial content in mass per volume (ug/ml) so it is difficult to make a direct comparison. I will discuss this later.
When we come to the flagellate count the SFI number is 13,863 per g (or per ml because 1 ml. of water weighs 1 gram). This is where my numbers disagree sharply with the SFI report. Remember that I did a conservative count of 90 flagellates per field of view.
The formula for roughly converting numbers of microorganisms per field of view to microorganisms per ml or g is;
(~ = divided by; field of view = FOV)
Number of microorganisms/ml = area of coverslip ~ area of FOV x number of organisms/FOV x number of pipette drops/ml
The 250X FOV of my portable microscope = .49 sq mm
The number of drops per ml. = 20
The area of the coverslips = 324 sq mm
Therefore; The number of flagellates/ml = 324 ~ .49 x 90 x 20 = 1,190,204.08/ml
Because 1 ml of water = 1 gram, this = 1,190,204 flagellates/g
This is over a million flagellates per gram. Even if my count is off by 10 percent or more this is still radically different from the SFI result. I attribute this to the plate culturing method they used.
Note that my prediction bore out; that the sample with the higher number of direct count flagellates is showing a lower number through the plate count method.
There is a comment in the lower portion of the SFI test which states that the aerobic bacteria are dormant. I would like to know how aerobic bacteria are determined without using plating or other methods.
B24 – Here again the observations I recorded (of active bacteria at about 3 to 4% and very thick total bacteria at about 20 to 30% showing very good; mention of okay fungal hyphae) seem to generally jive with the quality description from SFI (active bac. good; total bac. excellent). Again I cannot make a direct comparison because the bacteria are recorded in mass/volume.
On the surface it would appear that even our flagellate estimations concur were it not for the comments and the following report for B44. The comment at the bottom portion of the report states ‘Protozoa either not present in compost, or did not survive in the tea’
If we skip ahead to the SFI test result for B44, which is drawn from the identical Compost Tea brew (just 20 hours later) the number of flagellates reported is 277,259/g. In the lower portion of the report the flagellate count is described as excellent. Hold on; This is the CT where protozoa were either not present in the compost or did not survive the tea. What’s up with this? I attribute this to the potential inaccuracy of using the plate culture method to count protozoa.
Interestingly, even though the DO2 was miserably low when I drew the B24 sample there is no comment saying that the aerobic bacteria are dormant. The description makes this CT sample sound superior to A44 even though we have (to the best of our current knowledge) observed microbial activity and DO2 readings indicating the opposite. One good thing to know is that SFI measures the fungal hyphae at 4 micrometers and determines it to be beneficial. Now that’s the kind of meat and potatoes information I find useful. It backs up my estimates of 6 micrometer hyphae when everything is going right.
B44 – My numbers (less than 1% active bacteria but very high inactive bacterial biomass for a total of around 12 to 15%;) for bacteria observed seem to go along with the SFI qualitative description (active bac. low; total bac. good) except that I may have a higher total bacteria. This could be where their superior staining techniques may help define bacteria from other junk. Of course as previously outlined our flagellate counts are way different. My observation being about 2 flagellates per 250X field; quite low, translated; 324~.49x2x20= 26,530/ml = 26,530/g. Yes that’s what I call low but much lower than the SFI; 277,259/g.
Note that my predicted theory bears out again; the sample which had the directly determined lower count of flagellates ended up showing the higher count when the plate culture method of counting was employed.
I need to question the reason for the plate culture method being used to assess protozoa numbers in CT. Generally, in my understanding, a plate culture method is useful for determining the potential for a substance to produce certain microorganisms. It is therefore useful for application to soil, compost, humus, peat samples, etc. For CT samples I’m an advocate for what you see is what you got NOT what you see is what you might get if you culture these microbes out over 5 days. I could also be missing the point completely and am therefore open to being educated.
Back to Contents
Microbial Mass
I said that I would discuss the results for bacteria and fungal hyphae expressed in terms of mass per volume. This type of expression is used in various studies and analysis of microbes. It is deemed necessary for certain trials which have been carried out and there have been numerous approaches and formulae establishing conversion factors to interpret volume/volume of microbes as mass/volume or mass/mass.
I have searched for and read some of the research papers on which many of the accepted conversion factors are based for studies carried out by contemporary scientists. I have found the results to vary greatly and indeed even some of the authors of the papers warn that these are rough averages and one must have confidence in the methods used to formulate the presently used conversion factor for the specific group of microbes being utilized. We are talking about the weight of microorganisms here. You can’t use the bathroom scales so it is based primarily on the mass of carbon and there are many variables concerning environmental medium, growth rates, species, etc.
I have already been overly long-winded so I’ll not provide any excerpts but will be happy to email the journal articles to interested parties. I will, however list some of the conversion factors with the author(s’) name(s). I have converted them all into grams per cubic centimeter so there is some chance of misplaced decimal points. If you see any errors please let me know;
1979 – van Veen & Paul; bacteria - 0.8 g/cu cm; fungal hyphae – 0.33 g/ cu cm
1982 – Newell & Statzell-Tallman; fungal hyphae - 0.9 g dry/cu cm
1982 – Bakken & Olsen; bacteria – 1.09 g/cu cm and 30% dry matter (DM); fungal hyphae – 1.09 g/cu cm and 21% DM; I have trouble comprehending this one
1885 – Braktak; fixated bacteria – 0.056 g/ cu cm; wild bacteria(?) - 0.22 g/cu cm
1987 – Borsheim & Braktak; bacteria – 0.22 g/cu cm
1987 – Lee & Fuhrman; bacteria – 0.38 g/cu cm
There are other articles I could not access ($) and I’m sure there is more information available.
I asked the SFI lab in Oregon for their conversion factors and was told it is proprietary information, however Elaine told me in an email that as she recalls they are; prokaryotes (bacteria) - 0.31 g/cu cm; fungal hyphae - 0.44 g/cu cm
There is obviously value in expressing bacterial and fungal amounts like this, especially if one needs to perform calculations or express mass to mass ratios. For my information to use these results I’d like to know what the conversion factor is, what research the factor is derived from and what the high and low variances are. I have looked for this information on the SFI website and maybe it’s there but I have not seen it, nor have I found a basic description of their testing practices and techniques. At most labs they will give you this information with the exception of proprietary techniques for detection of species, etc.
The SFI test results can become confusing, otherwise. For example if we look at two of the SFI test results posted on the KIS website; One test is for their small brewer (I believe) and the Invoice # is 5795. The other test is for the vermicompost they use (Invoice 0). The tests use the same units of measure as ug/ml is the same as ug/g unless a sample has been dried (baked) first (their protocol does not state this that I know of) In the vermicompost the total bacteria is reported at 5969 ug/g while in the Compost Tea it is reported at 11648 ug/ml (ug/g). If they are using this or a similar vermicompost does this mean that the bacteria did not even double? Perhaps there is a totally different method for handling and testing the compost but without knowing this it is difficult to learn something from these results.
Using these two tests to review the validity of the plate culture method to count protozoa, in the vermicompost the flagellate count is 209,599 /g (/ml) and in the Compost Tea the flagellate count is 13,863 /ml (/g). If they are using this or a similar vermicompost in the brewer does this mean that the numbers were reduced by the brewer? Likely this is a factor of the plate culture method. Something seems wrong with the overall picture. It could be there is something I just don’t get and I need educating.
Something I pointed out before is that the flagellate number and amoebae numbers on the KIS test are identical at 13,863/ml but something I just noticed is that the flagellate number on my A44 test is also 13,863/g (/ml). What are the chances?
1/ It would be nice if someone from SFI could lay out as much as possible what their testing protocol is. 2/ What is your biomass conversion factor and where is it derived from? 3/ Can someone explain the reason for the plate culturing of the protozoa?
4/ How do you determine that bacteria are aerobic as noted in the quantitative test results?
What did I learn? I learned that I had to return to the drawing table as far as a couple of features for the Microbulator design. I had reaffirmed the importance of what is in compost to begin with and the ability of water to retain O2. This supports the practice of blending several substances for a broader range of microbes, like done by KIS. I have come to the realization that the SFI quantitative testing is probably not going to work for my purposes of illustrating the efficacy of the brewer; unless I’m shown to be full of it and re-educated. If anything I might prefer their little qualitative test. In a discussion with the biologist at Woodsend lab she expressed what I have observed consistently. A set of microorganisms in a CT sample does not stay the same for long making it difficult for shipping to the lab and getting reliable results. I guess I’ll stick to the video footage of microbes extracted to illustrate results for now.
Back to Contents
Resources & Links
Following are some links to useful resources and information. I will be adding to this periodically so keep checking in. Please let me know if you come across inactive links.
Worms;
Here is simple information I put together for keeping your own composting worms to supply your brewer with fresh vermicompost.> keepingworms.pdf
Venturi;
Here is a sketch venturisketch.pdf and text venturitext.pdf instructing the use of a water pump and venturi for building a compost tea brewer. It works.
Microscopes Advisory;
Here is a PDF copy of my Microscope advisory. It may help you with making a decision concerning a microscope purchase. Please note that in Spring of 2009 a gentleman named Theo from Holland pointed out my error in stating that Frits Zernike was German. I should have stated that he was Dutch, in business with Germans > microscopeadvisory.pdf
Thanks Theo!
A word about fish fertilizers;
I have had many questions regarding fish hydrolysates vs. fish emulsions. Well, now I’ve done a little research and can give an answer. Fish emulsions are produced under high heat conditions, which as we know kills most nutrients. Fish emulsions also separate the oils and protein which are marketed separately for other uses (fish oils & fish meal). Fish emulsions are therefore not very valid as a microbial foodstock.
Fish hydrolysate, on the other hand, is produced with a low heat process known as enzymatic digestion. All the oils, nutrients and amino acids protein are left intact resulting in a substantial microbial foodstock which can be ‘mineralized’ (made bio-available) and passed on to your soil and plants.
For these reasons, when given a choice it is better to pick fish hydrolysate over emulsion.
Here is a link to Great Pacific Bioproducts who make very fine quality liquid fish fertilizer (hydrolysate). Their product is available in British Columbia, Canada but bulk purchases in the Western USA are possible. I have tested their product and it grows the most enormous fungal hyphae from our vermicompost that I have ever seen. > http://www.greatpacificbioproducts.com
Here is a link to video footage of the microbial life observed in one of the tests I ran on their hydrolysate. The microbes shown were grown/supported from our vermicompost using only Great Pacific Bioproducts hydrolysate. No other food sources were present. It supported fungal hyphae meaning that in the soil, micorrhizal fungi would derive food from the hydrolysate and it supported the growth of bacteria, amoebae and flagellates. > 8 MB > 5 MB
For those of you in the USA, I have run similar tests on Organic Gem fish hydrolysate and find it to be highly satisfactory as a feedstock which supports/feeds fungi and bacteria.
http://www.organicgem.com and western distribution at http://www.greatwesternsales.com
Back to Contents
Some Friends
For an alternative compost tea brewer design and for fine quality compost, soil and nutrient packs go to Keep It Simple (KIS Organics; KIS Farm) and speak to my good friend Tad Hussey
https://www.kisorganics.com
http://www.kisfarm.com
For other needs or if you are in Colorado check out my buddy Jeremy Silva at Build-A-Soil https://buildasoil.com
A really good introductory book for delving into and understanding the microbial based horticultural world is 'Teaming With Microbes', A Gardener's Guide to the Soil Food Web. It is written by Jeff Lowenfels & Wayne Lewis, two good friends. I believe KIS carries the book as well as Amazon. Check out Jeff's other books Teaming With Nutrients & Teaming With Fungi and if you can go to one of his talks. He's very entertaining!
Back to Contents
Recipes Which Can Be Used With A 50 gallon (US) Compost Tea Brewer
Please also see my 2013 update for evolved information.
Brewing Temperature:
There has been ongoing discussion concerning the best temperature for brewing. There are two basic schools of thought; 1/ that one should brew at the temperature of the soil where the CT is to be applied. 2/ that the temperature range of 63 F to 70 F (17 C to 21 C) is the optimum for a maximum production and diversity of microbes. This aspect obviously needs research. I am of the opinion that one should brew at a temperature which maximizes microbial numbers and creates a functional microbial nutrient cycling consortia. I think that a large, self supporting, population has a better chance of survival once applied to the soil. Besides, if you brew at 50 F it may take days to have a microbial population. I therefore try to start my brews around 65 F.
Don't sweat it if your ambient temperatures are not perfect. Work with what the Earth gives to you. We often made ACT on the farm at temperatures as high as 100 degrees F or as low as 50 F. Like I always say, it is difficult to make bad CT, just easy to make it optimal when conditions are better. Even at those temperature extremes we still had good microbial populations. In heat you may not want to run as long. With the luxury of a microscope we could see when it was ready.
Compost:
If you are purchasing compost, I recommend compost from KIS or another source of compost which is known to be microbially active.
If you are home composting, generally speaking fresh vermicompost is just about the best substance one can use for brewing compost tea. If you can purchase some composting worms and feed them a variety of food you really can’t go wrong.
If you want a fungal compost SFI has recommended mixing oat flour (or powdered oatmeal) about 1:20 with your compost and keeping damp and covered with a cloth for 8 to 10 days. (I do not recommend this myself but wheat bran works just as well) This does work, although I am unsure whether there is a diversity of species of fungal hyphae grown. It may be more likely to grow something akin to bread mold. If you see white or blue fuzz growing on the surface turn it under. What we want is transparent and colored microscopic fungal hyphae. Really if there is not already fungi in your compost, you cannot make it magically appear at the last moment.
A side benefit to this procedure is that if left longer than 10 days I have seen multitudes of bacterial feeding nematodes growing. I’m not sure if this is peculiar to my compost. Try it. Compost tea is not a good medium for distributing nematodes. Better to distribute them by hand in the compost.
Another trick to encourage fungal growth is to use good quality fish hydrolysate diluted in water (e.g. around 2 ounces per gallon of water) and dampen compost and cover for around 5 days with a cloth.
Although I am providing these recipes and guidelines which have worked for me, I cannot guarantee they will work identically with all brewers and compost quality. I encourage you to experiment but exercise common sense and consult with your professional contact.
The recipe amounts given are for use with water that has a TDS/EC (total dissolved solids) of 35 PPM (parts per million) or less. This is really pure well or spring water with a relatively low mineral content. Water with a high mineral content (or that is turbid) has a lower capacity to maintain dissolved oxygen. If you know or suspect that your water has a high mineral content or high TDS then it is advisable to reduce the amounts of compost and feedstock (e.g. molasses, kelp meal, rock powders, fish hydrolysate, etc.). The amounts of compost recommended are for a very efficient brewer, capable of raising DO2 rates close to 10 or 12 PPM. If this is not your situation, reduce the amounts used.
Please be aware that the quality of the compost or vermicompost used is directly proportional to the quality of the compost tea produced.
Some Measures;
50 gallons US is 189 liters
1 gal. = 3.78 liters
1 liter = 4.2 cups US
1 liter = 1.05 quarts US liquid
1 US ounce = 29.57 ml
Bacteria/Archaea
You will note that I use the expression bacteria/archaea rather than just bacteria. This is because recent scientific research has revealed that there is a distinct species, Archaea, co-habitating with bacteria which previously was called bacteria. The only way to tell them apart is through complex analysis. The difference is in their membrane structure and therefore their ability to process (digest) different substances. Because I can’t tell them apart under the microscope I have decided to name them both.
Despite the following recipes, I have evolved myself to a more simple formula, using only vermicompost and black strap molasses for a diverse nutrient cycling ACT, however many growers over the years swear by the following recipes. Please read my 2013 update (contents).
A/ Recipe for a Diversity of Microbes; Nutrient Cycling
- measurements do not need to be precise; expressed in different units in brackets.
*compost/vermicompost – 2.38% max. (4.5 liters), (19 cups US), (4.5 quarts US) – reduce as required according to brewer and water quality
*unsulphured pure black strap molasses - I recommend using 0.50% (just under 1 liter), (4 cups US) (1 quart US) [but you can use a maximum 0.75% (1.4 liters), (5.9 cups US), (1.4 quarts US)] – reduce as required according to brewer and water quality
*fish hydrolysate(high quality) - 0.063% - (120 ml); (4 ounces)
Do not use chemically deodorized liquid fish!
*kelp meal - 0.25% max. (0.5 liter or 500 ml), (17 ounces US), (0.5 quart US), (2 plus cups)
NOTE: This is a maximum amount of kelp and you can experiment using less. This is using regular grade kelp meal for livestock. If you have soluble kelp, I recommend using smaller amounts. Sometimes kelp meal can initially delay microbial development and call for a longer brew.
*soft rock phosphate granules/powder - 0.063% - (120 ml) (4 ounces), (0.5 cup)
We grind up the granules into a powder with a coffee grinder
Length of Brew;
This will provide a CT with a microbial content of, bacteria/archaea and fungal hyphae (if present in compost) when brewed for 18 to 24 hours. When using our fungal inhabited vermicompost, the optimum time seems to be 18 hours for a bacteria/archaea and fungal brew. If brewed for 30 to 36 hours (and up to 42 to 48 hours if you have a microscope) there will be flagellates and amoebae (& some ciliates) as well, providing a functioning microbial consortia which is better for nutrient cycling in the soil/root interface. Because of the variations in brewing compost tea, it is better to examine the microbial content with a microscope and decide at what period of the brew you should apply it but if you do not have a microscope then use the CT between the time periods mentioned above for the desired effects.
Extras (when using extras you may wish to adjust amounts of other ingredients to avoid overload)
*pyrophyllite clay powder – 0.063% - (120 ml), (4 ounces), (0.5 cup)
This is a good ingredient to stimulate more bacteria/archaea diversity which seems to experimentally contribute to disease control. It can be found here at a reasonable price. http://www.continentalclay.com/detail.php?PID=695&cat_id=197&sub_categoryID=4
*alfalfa meal – up to 0.25% (.5 liter or 500 ml), (17 ounces US), (0.5 quart US), (2 plus cups)
This promotes the growth of flagellates and amoebae and is also a fungal food. Just get the cheap stuff by the bag at the feed store, checking that it does not contain anti-microbials
*Canadian sphagnum peat moss Premier Brand – throw in a handful or two to promote flagellates and amoebae and/or fungal hyphae. Batches are inconsistent, so unless you have a microscope you won’t be sure which set of microbes it will promote but I have never seen anything bad.
B/ Fungal Dominant;
*compost/vermicompost (fungal content) - 2.38% max. (4.5 liters), (19 cups US), (4.5 quarts US)
*unsulphured pure black strap molasses - 0.25% (475 ml rounded), (2 cups US), (0.5 quart US)
NOTE: Also experiment with eliminating black strap molasses. Recent trials have shown that with some types of compost the fungi does better. If you have a microscope check it out for yourself.
NOTE: If you have activated your compost with oat flour I recommend NOT using molasses in addition to fish hydrolysate unless you are willing to brew for a longer period and best to have a microscope.
*fish hydrolysate(high quality) - 0.190% - (360 ml) (12 ounces) Do not use chemically deodorized liquid fish! You may experiment using slightly higher amounts.
*kelp meal - 0.25% max. (.5 liter or 500 ml), (17 ounces US), (0.5 quart US), (2 plus cups)
NOTE: This is a maximum amount of kelp and you can experiment using less. This is using regular grade kelp meal for livestock. If you have soluble kelp, I recommend using smaller amounts. Sometimes kelp meal can initially delay microbial development.
*rock phosphate granules/powder - 0.063% - (120 ml), (4 ounces), (0.5 cup)
NOTE: We seem to get the same results using 100 ml of rock phosphate but experiment yourself. Sometimes we run the rock phosphate granules through the electric coffee grinder to get a fine powder.
Some studies show certain sources of soft rock phosphate to contain radio active materials so you may wish to research this.
Extras (when using extras you may wish to adjust amounts of other ingredients to avoid overload)
* Humic acid - I am no longer recommending the use of humic acid in compost tea, as I've not seen any benefits from doing so. Better to apply it directly to the soil.
*you could also add one of the Alaska ‘Humus’ products and/or Canadian sphagnum Premier brand at 0.25% or less. If there are fungi spores present in the substance, hyphae should grow.
*you may add a little soil or partially/completely decomposed forest litter (rotted leaves, wood pieces). If you are applying CT to grass or flowers use some local soil from a healthy (unmanipulated by man) area where similar plant species are doing well. If you are applying to deciduous trees or bushes then gather some soil or forest litter from a deciduous forest where the forest appears healthy and has that…you know… fabulous earthy odor. I recommend using 500 ml. (0.5 liter) or 2 cups to begin with and see how that works out. Careful to not use big chunks if using the Microbulator 50.
Length of Brew
Brew until fungal hyphae is observed with a microscope or for 18 to 24 hours. When using our fungal inhabited vermicompost, the optimum time seems to be 18 hours for a bacteria/archaea and fungal brew, however fungal hyphae is extracted at 10 hours with less bacteria/archaea present. If you want a fungal dominant brew this may be the best time to apply. For those of you with microscopes, check it out. This recipe, provided there are fungi spores in your compost, should produce a higher volume of fungal hyphae and reduced bacteria/archaea numbers. (at 10 hours approx)
Back to Contents